Wooqer enables you to ‘Share and Track information’ and ‘Collect and Analyze data’.
There are various building blocks, available on Wooqer which enable you to create WorkApps towards these two core objectives. Each of these building blocks has it’s own purpose and it’s important to know which building block to use when. So let’s get started with understanding the Wooqer building blocks.
Create Module
A Module is a collection of Chapters (files) meant for delivery to a common target audience. It can be a simple communication, a knowledge repository, a new launch or coursework with a learning objective!
When to use this building block
In Modules you can add various chapters (files) everyday to keep your team updated will all the changes. You can also use this for training users on your new SOPs, Training modules etc
Inclusions
Chapters: PDF, PPT, EXCEL, Video, Audio, Images, ZIP
Questions: MCQ, Short, Descriptive
Module properties: Objective, Summary, Module Type, References, Duration, Role Locking
Exclusions
Questions: Score, Rating, Drop-down select, NPS, Location
Process properties: Coverage's, Timezone, Occurrence, Cut-off, Data Edit, Geo-compliance, Duplicates, Only Camera Evidence, Multiple Records, Maximum Score, End Date, Group Code, System Calculated Score
Use cases
Store Communication, Visual Merchandising guidelines, SOP guidelines, Training content
If you have not created any Module on your Wooqer yet, start with Chapter creation
Go to the 'Content' >> 'Chapters' tab on your Wooqer Producer view
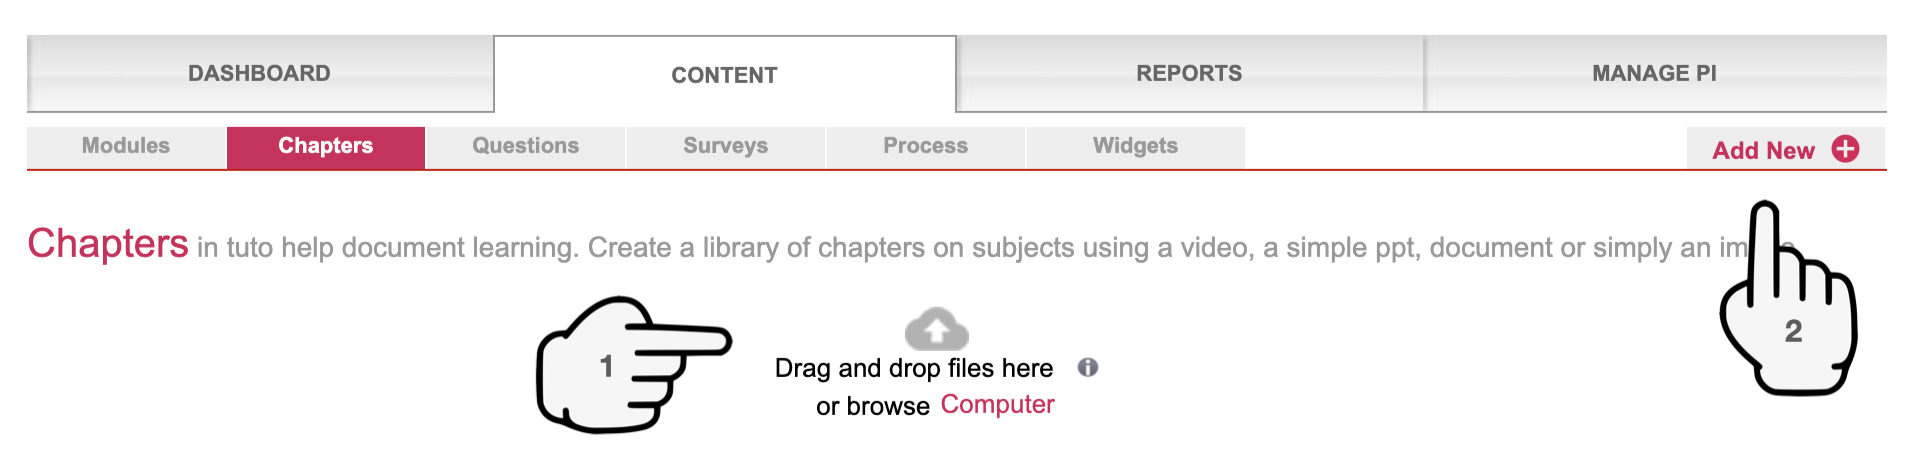
Option 1: Drag and drop files in bulk
- This option is recommended for bulk upload of multiple files.
- You can upload upto 20 files in one go with each file being a maximum of 25MB.
- Questions cannot be added to Chapters during upload when using this approach. Try Option 2: Add files one by one when uploading learning content or upload in bulk and then go on to Edit Chapters to add questions later.
- The name of the uploaded file automatically becomes the Chapter name. So it is recommended that you name files to what you wish see them called on Wooqer. You can Edit Chapter name after uploading and saving it also.
Option 2: Add files one by one
Click on 'Add new' within the Chapters screen to create Chapters individually. This approach is recommended when uploading large files or learning content where each file has some questions attached to it.
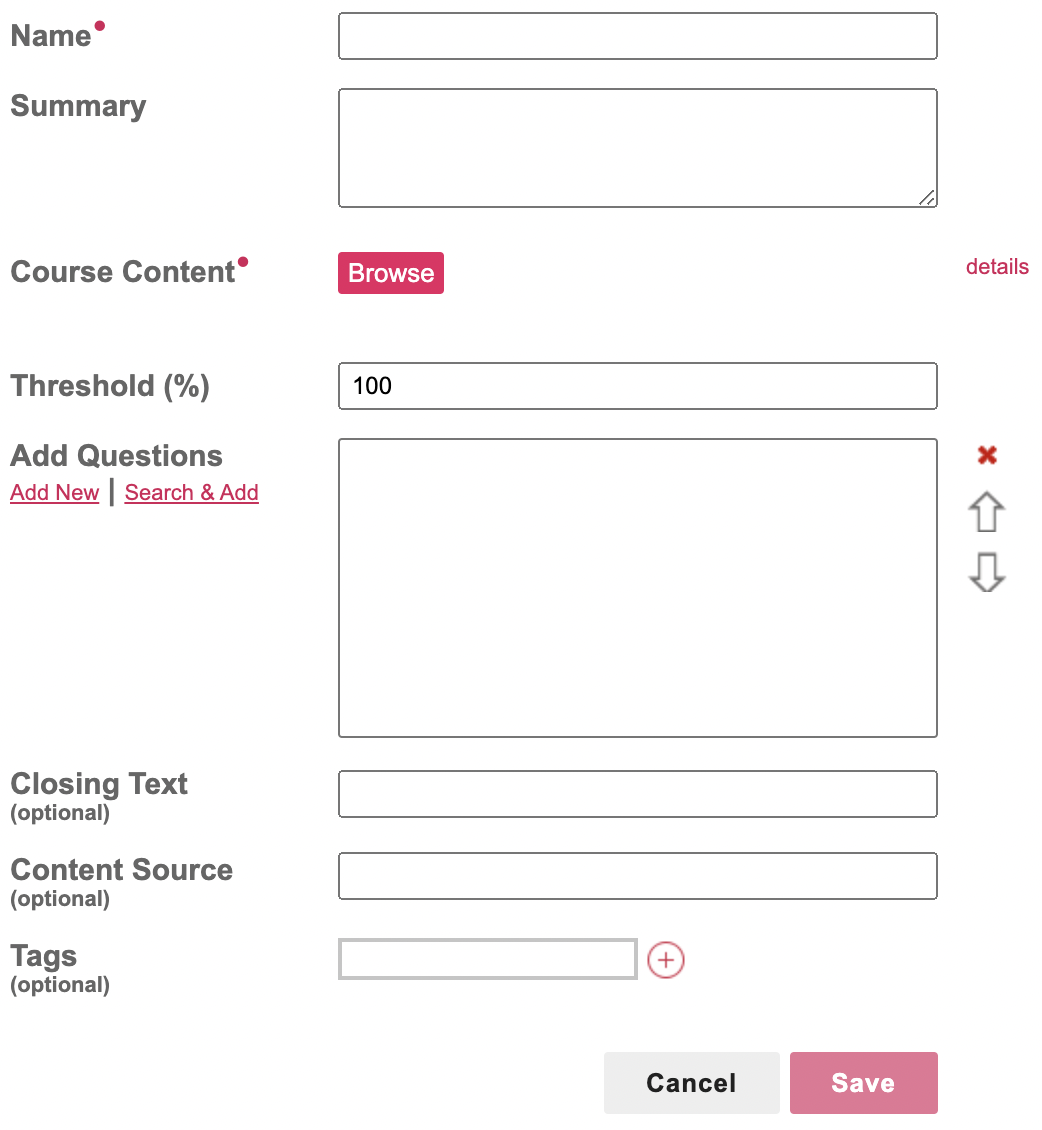
| Property | Mandatory | Editability | Description |
| Name | Yes | Change any time while inactive | The name as you would want it to be visible to users. Each Chapter should have a unique name upto 30 characters. Go for names that users are likely to use when searching for this content |
| Summary | Change any time while inactive | Add a brief about the Chapter | |
| Course Content | Yes | Change any time while inactive | This is the file that you wish to upload. You can upload a single file in pptx, pdf, docx, zip, audio or video format. ZIP, Xlsx and Cdr files can be shared through Wooqer but remember to make them downloadable as they need to be downloaded for viewing. Each file can be upto 500MB |
| Threshold | Change any time while inactive | If you intend to add questions to the Chapter, add a Threshold to define the pass percentage against those questions | |
| Add Questions | Change any time while inactive | To assess your users’ understanding of the content, it is recommended that you ad questions that follow the content and need to be answered for the users’ to be marked as progressed on this Chapter.
Go for MCQ questions, where the correct answer can be marked and the user’s progress auto-assessed. Users are marked as progressed when they can answer all questions correctly. In absence of questions, user can Mark completion actively by clicking on a ‘Mark Complete’ button / icon at end of Chapter You can ‘Add new’ questions or ‘Select questions’ tat you may have created for another Chapter in the past, from the Question BankUse the arrow icons on the right to change question order. Use the 'X' sign to drop a question |
|
| Closing Text | Change any time while inactive | Add text to show to user post Chapter Completion | |
| Tags | Change any time while inactive | Files can be searched using Module name, Chapter name and Tags. Tags allow you to add upto 5 Search key terms against any Chapter (file). The words should be single words without spaces in between. Click on the + icon to add more tags |
Click on 'Save' once done
You will now get an option to 'Share' or 'Skip'
'Skip' to go to the Chapters screen and make further edits to the Chapter. You can make it Downloadable, Enable comments, change Chapter name, change File or change/add/ remove questions. When done with creation of all your Chapters, go to to Create 'Module'
'Share' to create a new Module with this Chapter added to it.
Pro Tip :Do not create new Modules for every file that you need to share. Create a set of Modules as placeholders for various subjects and add/ remove Chapters from these Modules.
You need to have at least 1 Chapter created on your Wooqer ID to start creating your first Module.
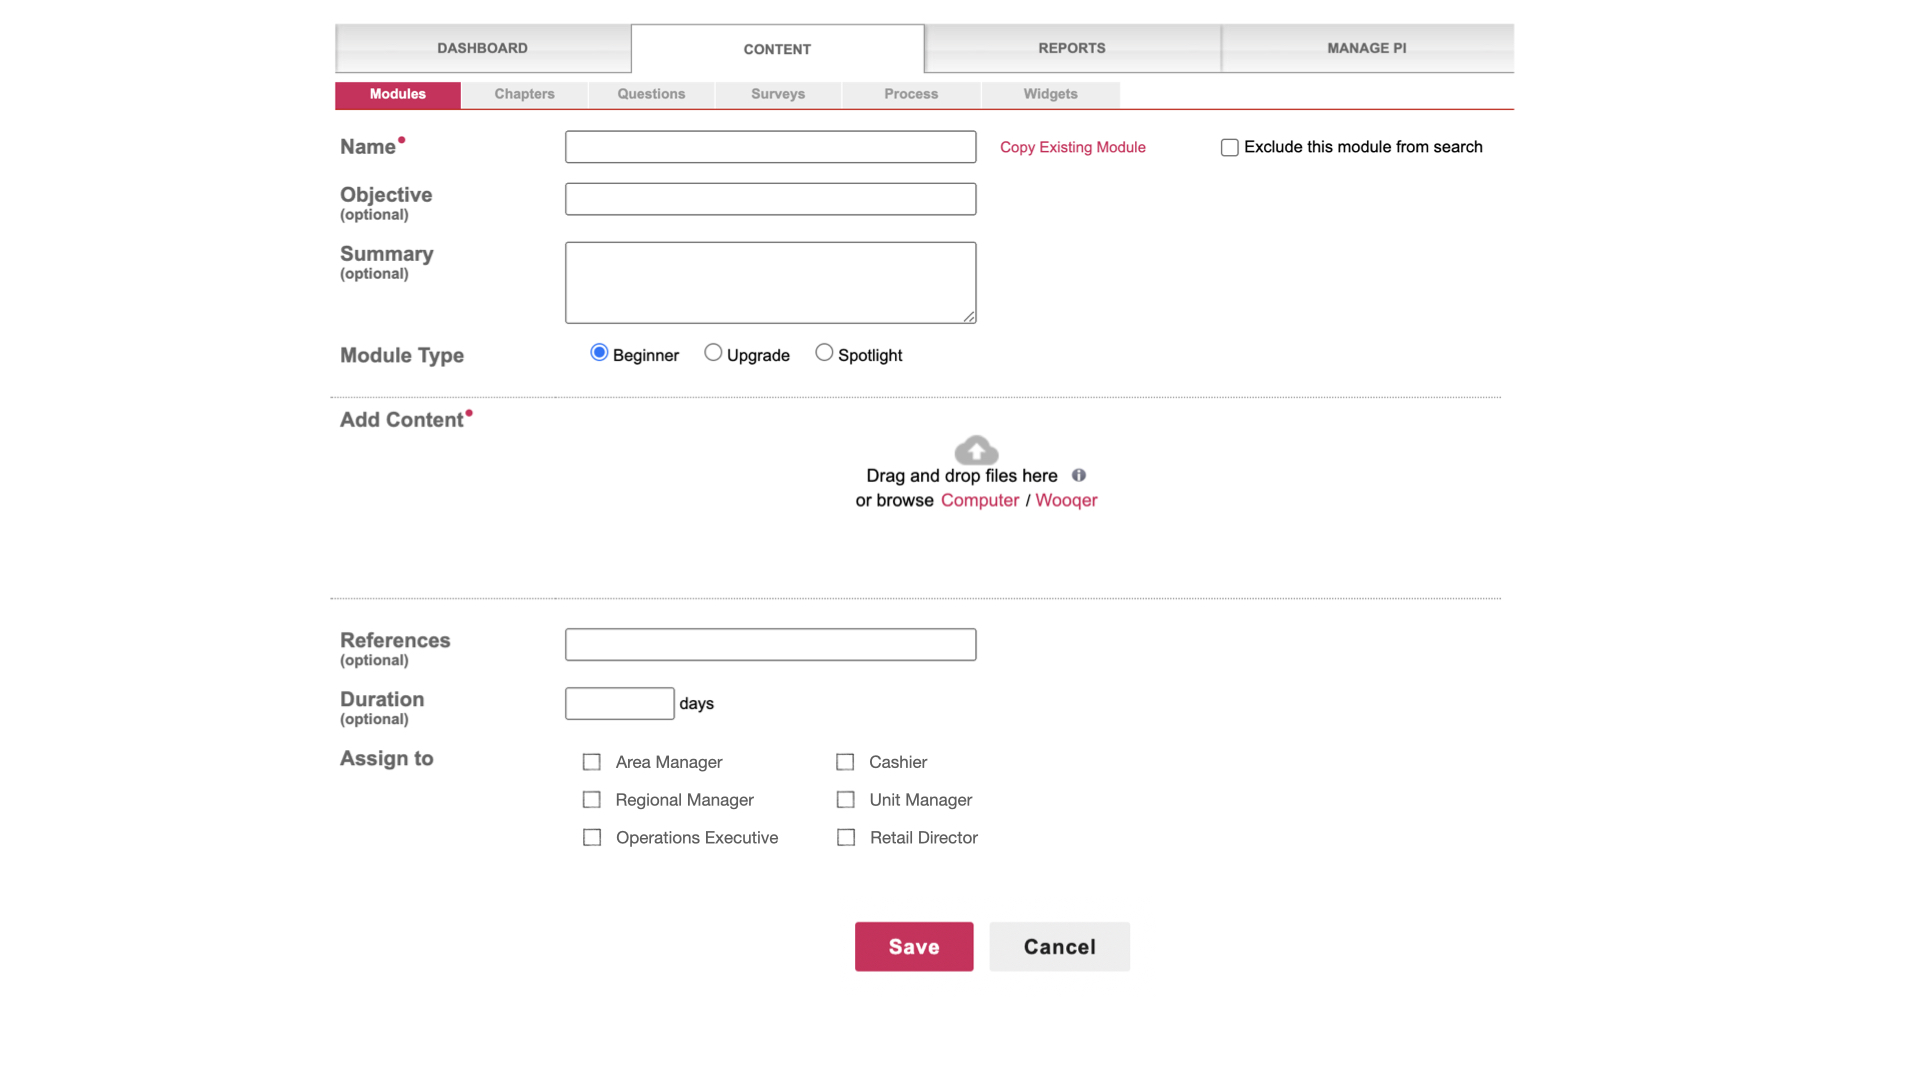
Go to the 'Content' >> 'Modules' tab on your Wooqer Producer view an click on 'Add New' on the right

Create the module by defining the following
|
Property |
Mandatory |
Editability |
Description |
| Name |
Yes |
Change any time while inactive |
The name as you would want it to be visible to users. Each Module should have a unique name upto 30 characters. Go for names that users are likely to use when searching for this content |
|
Objective |
Change any time while inactive |
Define an objective that is communicated to users as part of the launch communication mail | |
|
Summary |
Change any time while inactive |
Define a summary that is communicated to users as part of the launch communication mail |
|
|
Module Type |
Yes |
Change any time while inactive |
A module tagged as "Beginner", can be seen by Induction & Advanced level of users. Whereas, a module tagged as "Upgrade" can be only be seen by Advanced level of users. Always go for ‘Beginner’ Modules marked as ‘Spotlight’ act as Featured or Sticky modules and are always visible under the Spotlight section |
|
Add Content |
Yes |
Change any time while inactive |
Upload new Chapters (files) from your computer or click on "Wooqer" option to add Chapter(s) already created on your Wooqer. Just as in Bulk Chapter upload, you can upload a maximum of 20 files using the drag and drop feature with each file being less than 25MB. The file name shall automatically become the Chapter name, so name your files accordingly. You can go back to Edit Chapter and change Chapter name later. |
|
References |
Change any time while inactive |
This is purely for your personal reference to remember any context that you need to, around this Chapter. No one else sees this |
|
|
Duration |
Change any time while inactive |
If this Module has time bound relevance, add a ‘Duration’ post which the Module will automatically deactivate and o away from your users’ screens. However as this happens, you shall continue to see the content and the reports on your Producer view and can edit/ reactivate the module if needed. Not adding any duration makes the module perpetual in nature and it shall stay active till you choose to deactivate it. |
|
|
Assign to |
Recommended |
Change any time while inactive |
By assigning the module to specific roles at this level, you can lock the module to people holding those roles and new people joining coming into the assigned roles shall automatically get access to the module on ID creation /role change. If you are not ready to launch the module yet and wish to test it by assigning to yourself or some select people first, do not assign here yet. Go on to do a manual assignment to self for testing and come back to Edit the module and do the role locking |
Click on the 'Save' button. You can now 'Configure' the module first or go on to 'Assign' it straight away.
If you click on "Configure", you will be redirected to a screen where you can manage the added chapters and set their properties and arrangement.
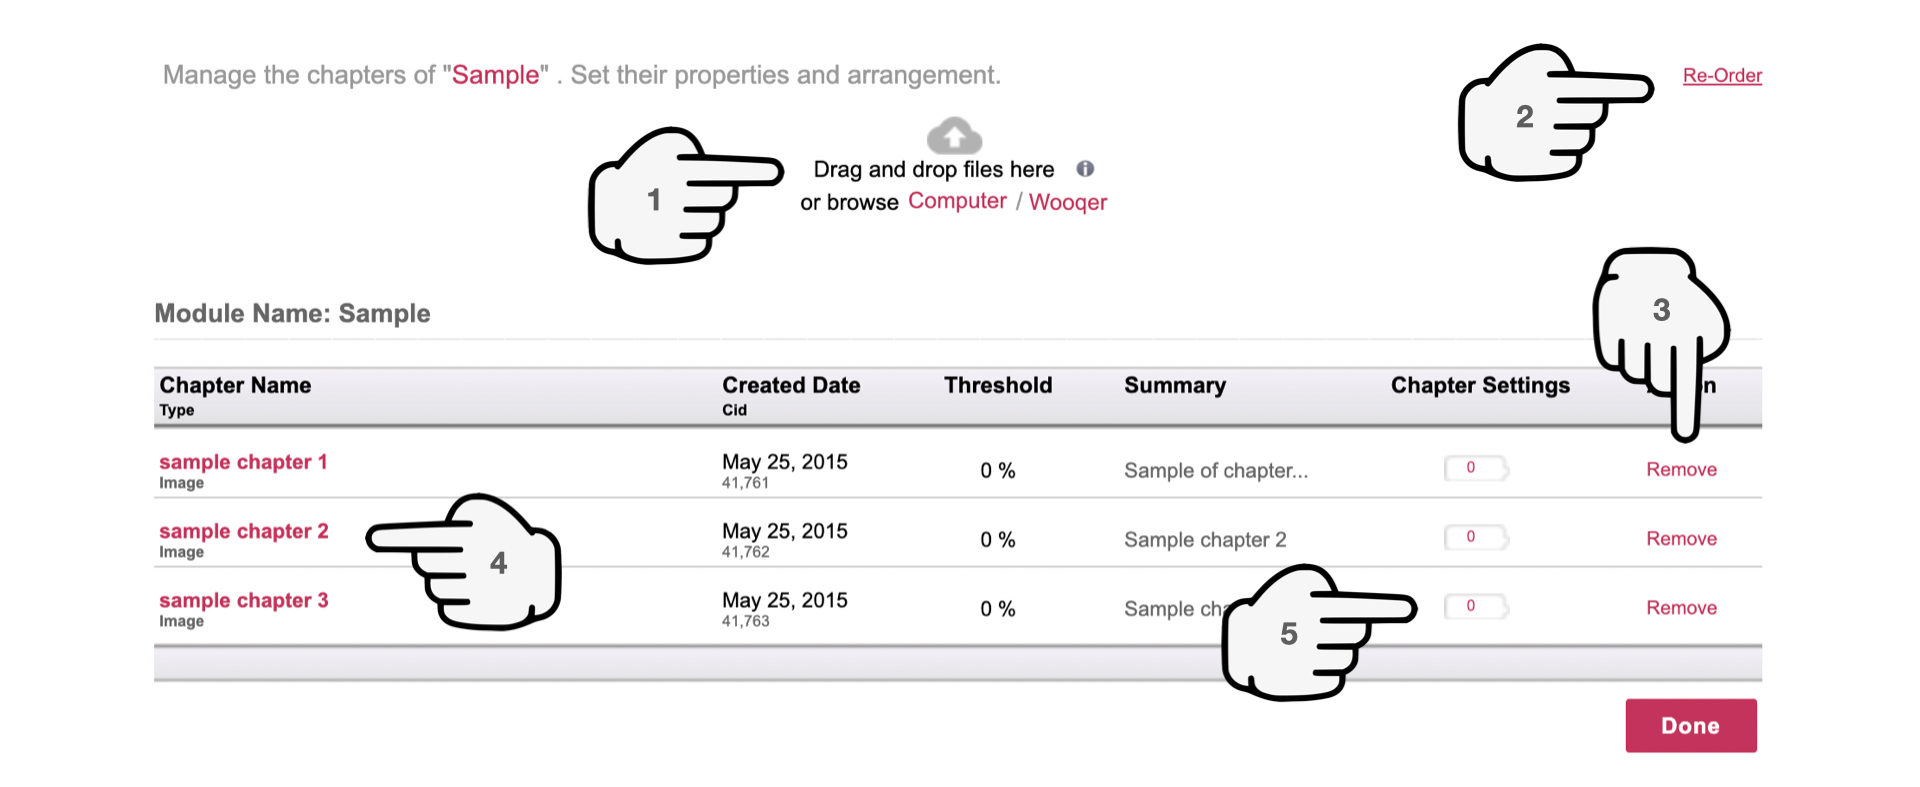
1. Add more files - If you had missed uploading some files originally, drag and drop more into the Module now
2. Reorder - Change the order in which the Chapters are presented int he module
3. Remove - Feel free to remove Chapters that were included mistakenly and need dropping
4. Click on the Chapter name to preview the uploaded file and make sure that it has converted properly
5. Define Chapter Settings
Comment - Click on 'change' to enable users to 'Comment' on the Chapter. You can do this only if you are the Chapter owner.
Public - When Comments are public, it means that all assignees of this Chapter can comment on it and read each other's comments on a common thread. Change status to 'Private' to enable multiple such threads to open up and comments by each assignee to be visible only to you.
Click on 'Done' oncc ready to move on and Assign the Module to your target audience
If you had assigned the Module and locked it to specific roles while creating it, the module would already be shown as assigned to the target users at this point.
However, if you had not yet locked it to roles or do not wish to assign by roles, you can do specific assignments now.
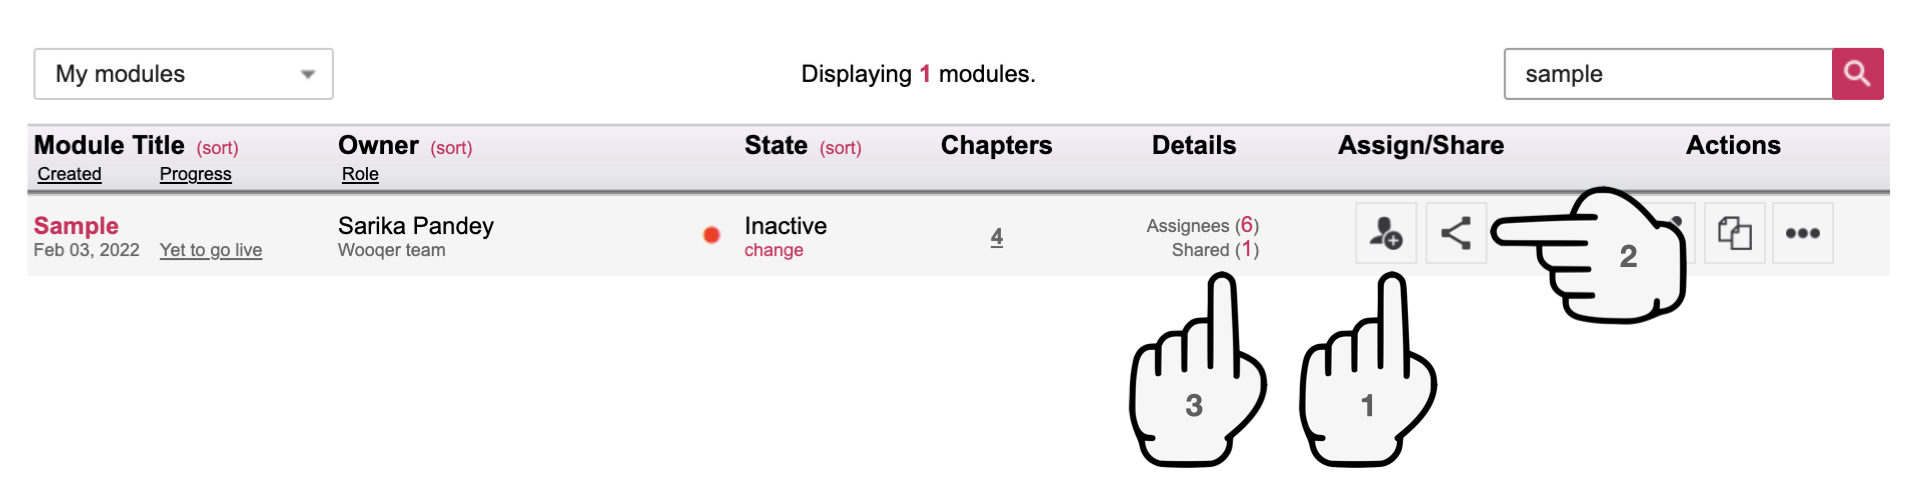
1. Assign - Click on the 'Assign' icon to assign the Module to your target audience. The 'Assignees' shall be able to and responsible for seeing the uploading content and where applicable answer questions to be Marked as progressed on the Module
2. Share reports - Click on the 'Share' icon to share reports of the Module with specific users
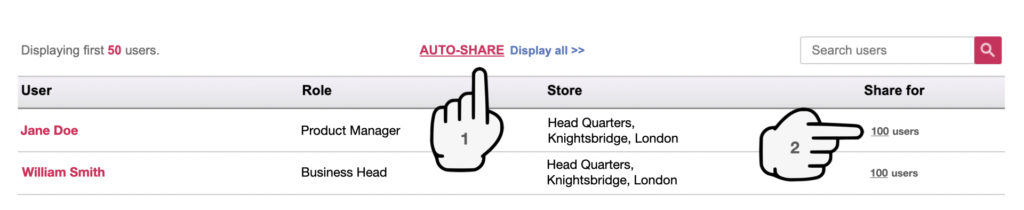
- Auto-share the report with users themselves, their Managers or multiple levels of their Management hierarchy
- Use the Search box to find the user you wish to share the report(s) with and click on the number of users on the right to define if they can see the report for all users or a specific set of users.
3. See Assignees | Un-assign - A very unique feature of Wooqer is that you can also withdraw content access from users at any point of time. This is super useful when a wrong person has been extended access by mistake. Just click on the list of Assignees or Shared to see who has access to what and withdraw access if needed or add more assignees in case someone got missed out.
Click on 'Activate Module' or once you are done with your Assignments or come back to the 'Modules' screen and click on the 'change' button under 'State' to activate the Module.
Create Data Collection App
Data collection is the process of gathering and measuring information on targeted variables in an established system, which then enables one to answer relevant questions and evaluate outcomes.
When to use this building block
Use this to collect any kind of data - quantitative or qualitative. Allow dynamic alteration by adding questions depending on the answers provided by the users.
Inclusions
Questions: MCQ, Short, Descriptive, Score, Rating, Drop-down select, Dependent, NPS, Location
Process properties: All Coverage's, Timezone, Occurrence, Cut-off, Data Edit, Geo-compliance, Duplicates, Only Camera Evidence, Multiple Records, End Date, Group Code
Exclusions
Process properties: Question Tag, Maximum Score, System Calculated Score
Use cases
Daily Sales Report, Ops Issue Tracker, VM Review
Go to your Wooqer Producer view on the web browser and click on Create >> Process
Process Type - Data Collection
Process Name - Give the name for the Apps to be created. The name can be upto a maximum of 25 characters.
Click on 'Continue' to start configuring App properties
| Property | Mandatory | Editability | Description |
| Process Name | Yes | Change any time | You can change the name of the WorkApp. The name can be upto a maximum of 25 characters |
| Process Objective | Yes | Change any time | As new people access this WorkApp to submit information, the objective helps them understand the purpose giving them context to start using the WorkApp. |
| Instructions | Change any time | Add instructions for new users to understand how to use the WorkApp | |
| Coverage |
Can change coverage type till first submission Can add more coverages any time Can remove coverage till data is received against it |
"Coverage" defines the index entity against which data is stored and maintained on Wooqer. User submitting data or accessing reports may change over time, but the index entity to which the data is linked is perpetual. You can choose from Cities, Units, Modules, Users, Process, Resources and Others. Remember to click on 'Select ' after choosing the Coverage type. Coverage cannot be changed once data is received. | |
| Occurrence | Yes | Can change till first submission | Configure whether the Process is going to be "One time" or "Recurring". Occurrence cannot be changed once data is received. |
| Timezone | Yes | Change any time | Select the Time zone in which the process shall be run/ managed from. Cut-off time will be calculated as per this time zone. |
| Periodicity | Yes | Can change till first submission | This field gives you an option to select how often this Process repeats itself. You can choose from daily, weekly, monthly, quarterly, half-annually, annually or set a custom frequency. Periodicity cannot be changed once data is received. |
| Cut off |
Has a start time: Defines the earliest that this process can be accessed and data submitted by users within the given period. Cut off: Use this to define the cut-off for the process and track whether the submission happened in time. Leaving it blank makes the end of the chosen period as the default cut-off. Reminders get scheduled against the defined cut-off or the end of the chosen period |
||
|
Geo Location VAS* |
Available only when coverage is ‘Store’ or ‘Unit’ By invoking this option, you can enable geo-tracking and/ or geo-fencing on the process, i.e. define that submissions should be made from within the location and whether a submission cannot be made from outside the perimeter or can be made but will be reported as non compliant. To use this feature meaningfully, make sure that you have mapped the Latitude and Longitude of all your Business units during Unit creation |
||
| Enable Data Edit | This does not by default make all fields editable in the process but enables an Edit option on all Tasks within the process | ||
| Duplicates | The default setting on Wooqer is that only one submission can be received against a given coverage in a given period. Enabling duplicates allows more than one person to make a submission on the same coverage within the same period. For example: if the coverage is 'Unit', the periodicity - 'Monthly' and the process- a 'Unit audit' is assigned to both the Area Manager and Regional Manager of the unit, then both can audit this unit once in the same month. In such a scenario, you have an option to get a summary report with average, individual scores, lowest or highest score. Duplicates cannot be disabled once data is received. | ||
| Only Camera Evidence | By enabling this option, you can disable all attachment options on the entire process, except live pictures clicked from the camera. Leave this blank if you would prefer to make this choice at an individual Task level within process. | ||
| Multiple records | The default setting on Wooqer is that only one submission can be received against a given coverage in a given period. By enabling Multiple records, you can allow multiple users to make multiple submissions for the same process within the same period, removing all restrictions. Multiple records cannot be disabled once data is received on the process. | ||
| End Date | Your Wooqer processes are perpetual in nature and can be deactivated any time you desire. However, for short lived processes, you have an option to pre-define the End date. The process will be automatically deactivated on this date. You will have an option to change the End date and reactivate the process if desired. | ||
| Group Code | Yes | You can create a new group or use an existing one for easy accessibility of processes. To create a new group you will have to enter three Alphanumeric characters in the first field, once done, then you'll see an option to key in the title of the group in a small dialog box which appears instantly after keying in the data in the first field. If you leave this field blank, the process will by default end up in a default group called 'Others'. Group code cannot be changed once data is received on the process. |
'Save' the Properties and go on to Build the template
A. Define the structure
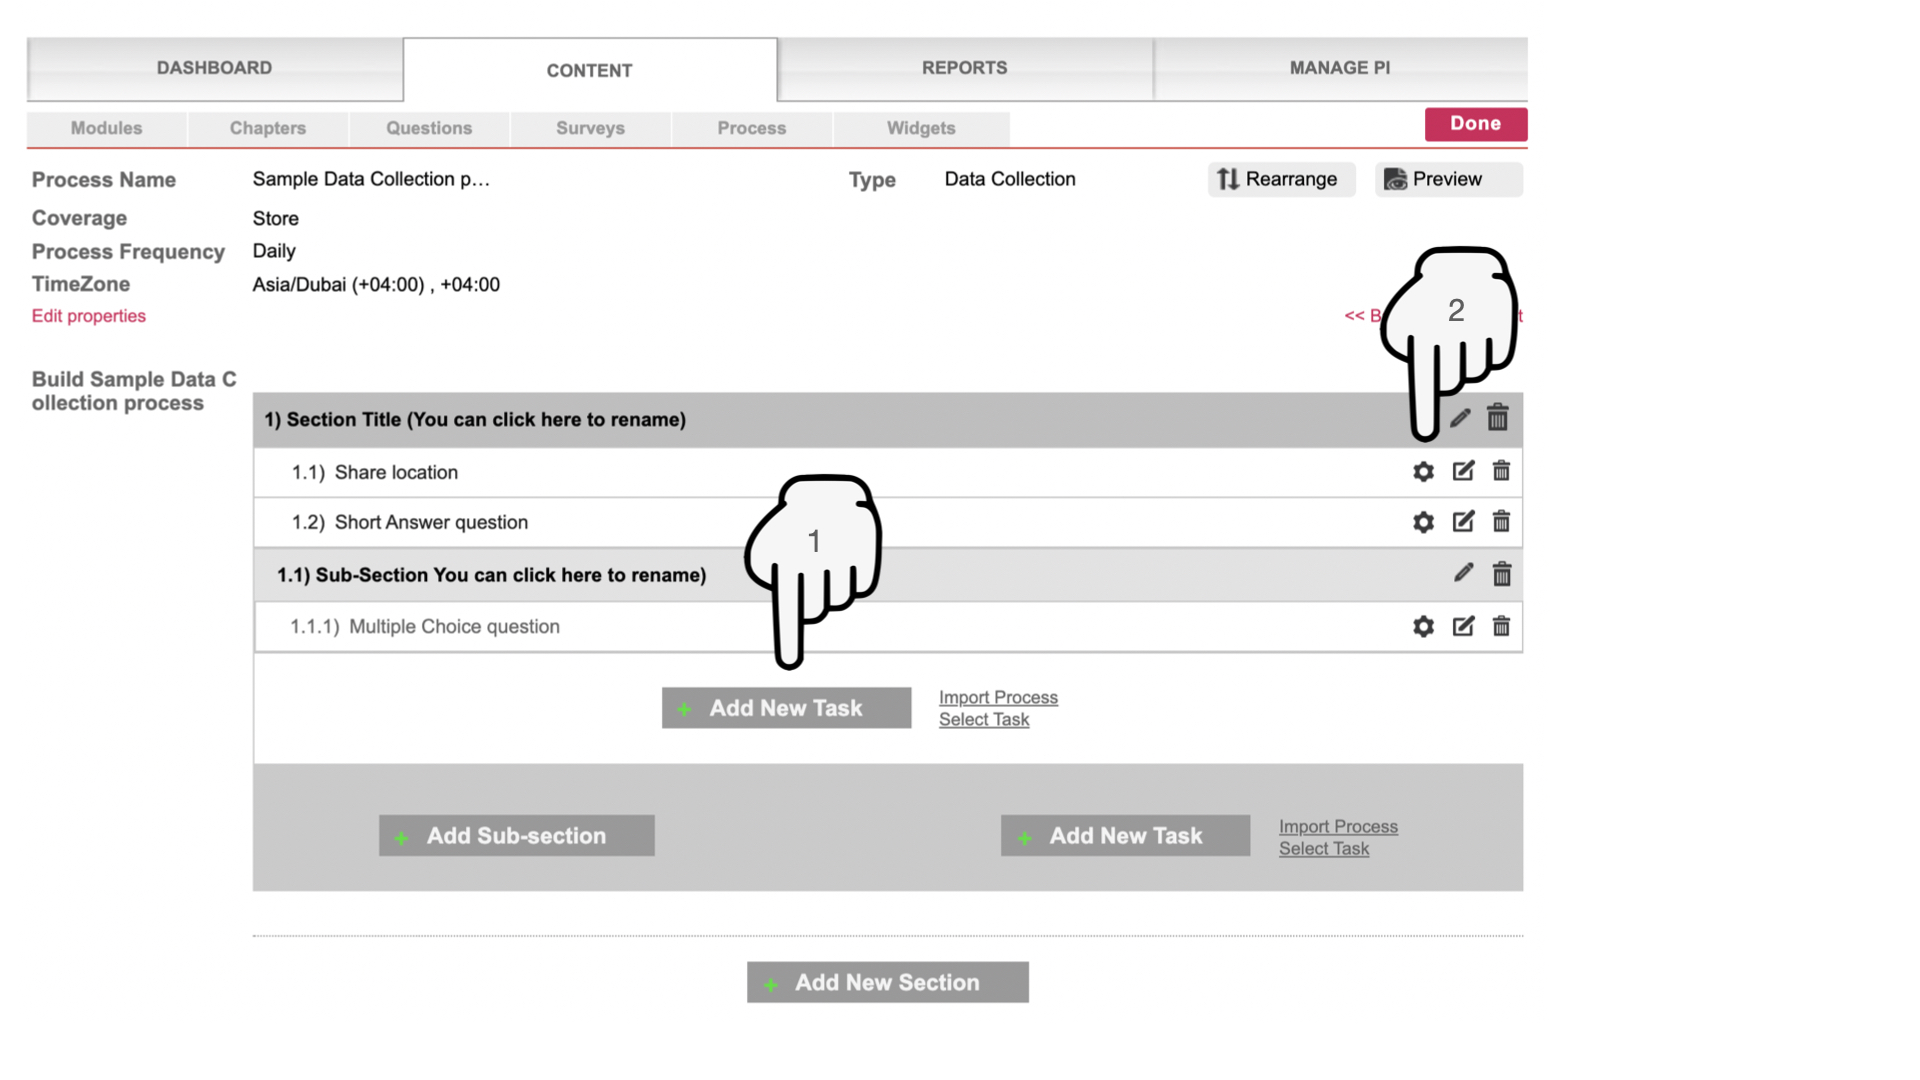
1. Add Section(s) if needed
2. Add Sub-section(s) if needed
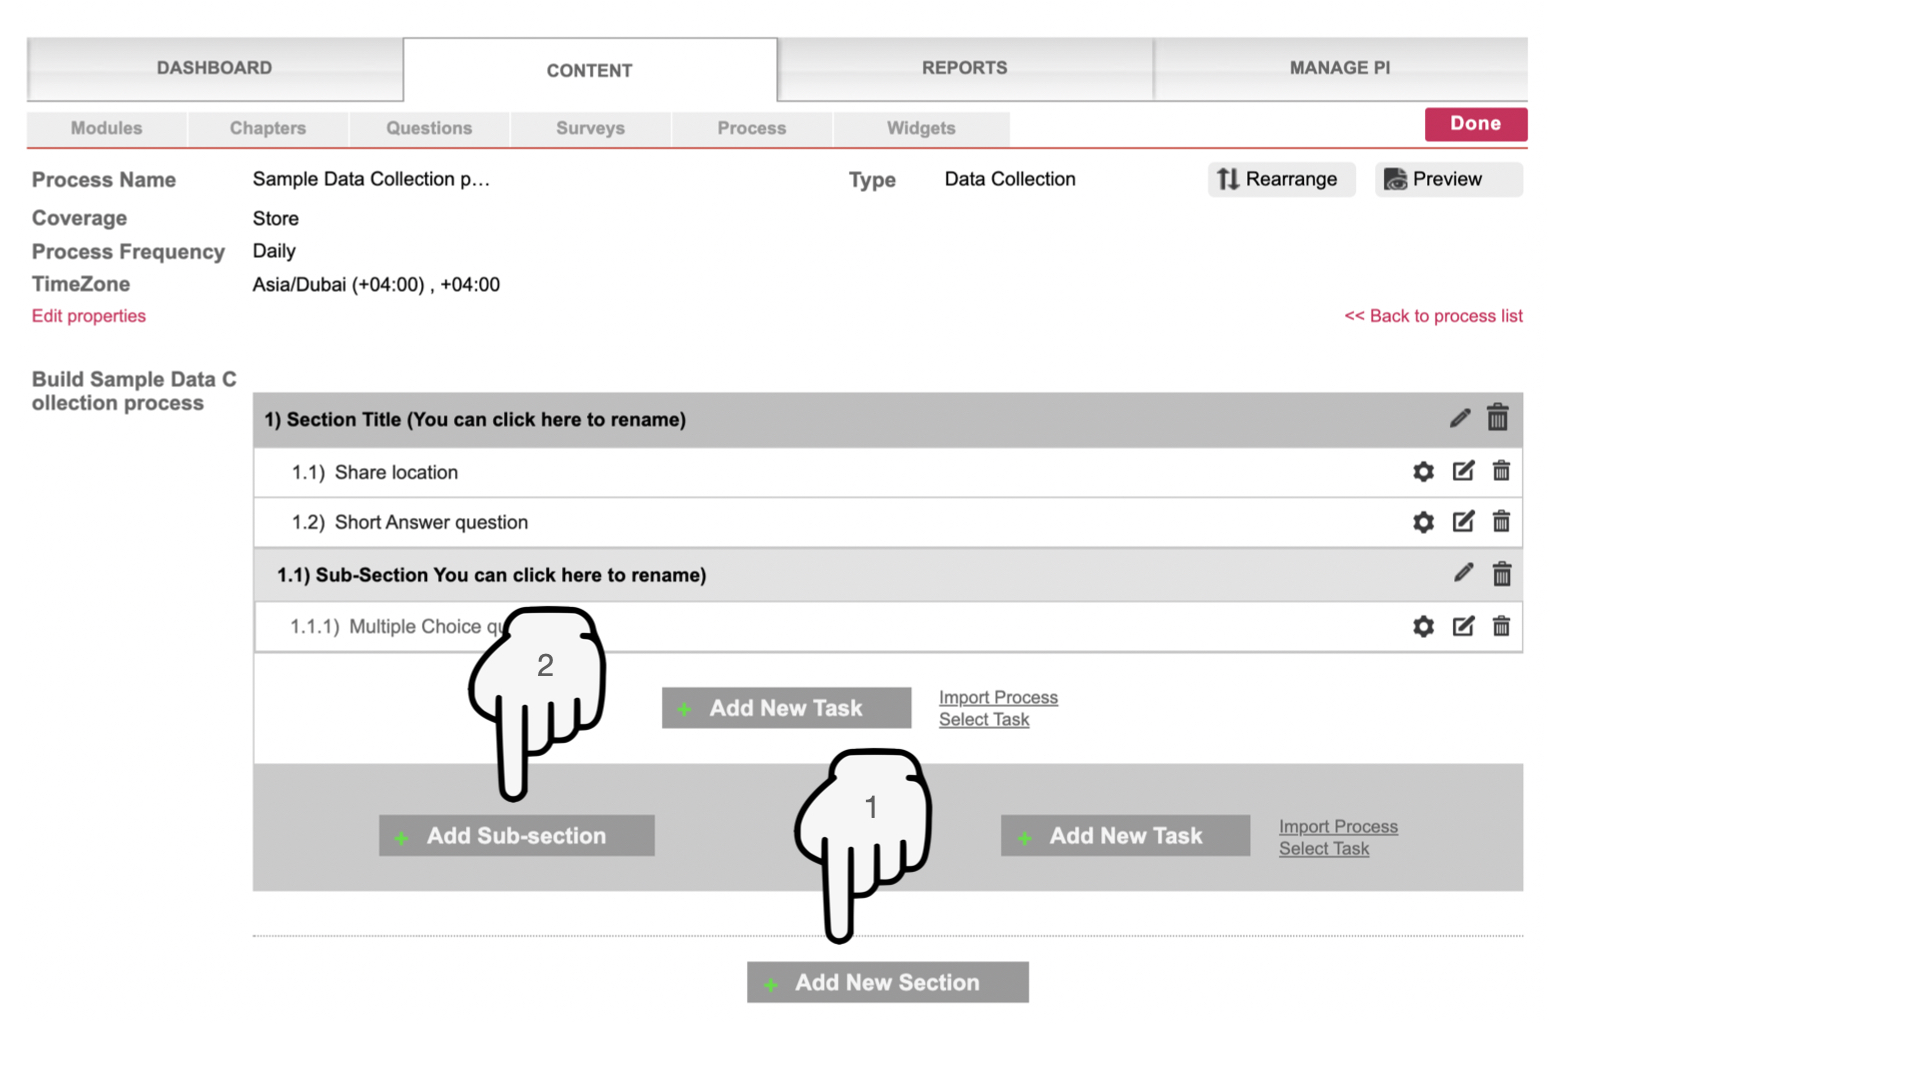
B. Add Tasks in the desired section/ sub-section and configure Task Properties
Click here to learn about tasks and choose the right one
Click here to learn about task properties
Need to make changes to your App? Click here to learn how to Edit your App
Click on the 'Done' button at the top or bottom right corner to save your changes and go on to Assign the App
You are now ready to go live with your WorkApp.
Your WorkApp can have 3 types of participants:
1) Assignees - All users who you 'Assign' the App to, are called assignees. Assignees participate by submitting information on the App
2) Report viewers - People who you 'Share' the report with can see data submitted by 'Assignees' for 'Coverages' for which report has been shared with them
3) Actioners - If you have enabled the 'Requires Action' property on your process to convert it into a workflow, the Assignee will submit the information to an 'Actioner' who would need to review the information and take further action on it.
Click here to learn how to Assign and Share your WorkApp. But before you take it to others, assign it to yourself first to make sure that everything is working as expected.
Create Checklist
Checklist is a type of job aid used to reduce failure by compensating for potential limits of human memory and attention. It helps to ensure consistency and completeness in carrying out a task. A basic example is the "to do list".
When to use this building block
Questions where the answer options are limited to two. Indicate the favorable answer and track compliance. Best suited for all types of checklists.
Inclusions
Questions: Multiple Choice Single Answer, Dependent
Process properties: All Coverage's, Time zone, Occurrence, Cut-off, Data Edit, Geo-compliance, Only Camera Evidence, End Date, Group Code, System Calculated Score
Exclusions
Questions: Multiple Choice Multiple Answer, Short, Descriptive, Score, Rating, Drop-down select, Dependent, NPS, Location
Process properties: Multiple Records, Duplicates, Question Tag, Maximum Score
Use cases
Start/End of day Checklist, SOP Checklists
Sample Report
Click on Content->Process -> Add New
Process Type - Checklist
Process Name - Give the name for the App to be created. The name can be upto a maximum of 25 characters.
Click on 'Continue' to start configuring App properties
|
Property |
Mandatory |
Editability |
Description |
|
Process Name |
Yes |
Change any time |
You can change the name of the WorkApp. The name can be upto a maximum of 25 characters |
|
Process Objective |
Yes |
Change any time |
As new people access this WorkApp to submit information, the objective helps them understand the purpose giving them context to start using the WorkApp. |
|
Instructions |
Change any time |
Add instructions for new users to understand how to use the WorkApp |
|
|
Coverage |
Can change coverage type till first submission Can add more coverages any time Can remove coverage till data is received against it |
"Coverage" defines the index entity against which data is stored and maintained on Wooqer. User submitting data or accessing reports may change over time, but the index entity to which the data is linked is perpetual. You can choose from Cities, Units, Modules, Users, Process, Resources and Others. Remember to click on 'Select ' after choosing the Coverage type. Coverage cannot be changed once data is received. |
|
|
Occurrence |
Yes |
Can change till first submission |
Configure whether the Process is going to be "One time" or "Recurring". Occurrence cannot be changed once data is received. |
|
Timezone |
Yes |
Change any time |
Select the Time zone in which the process shall be run/ managed from. Cut-off time will be calculated as per this time zone. |
|
Periodicity |
Yes |
Can change till first submission |
This field gives you an option to select how often this Process repeats itself. You can choose from daily, weekly, monthly, quarterly, half-annually, annually or set a custom frequency. Periodicity cannot be changed once data is received. |
|
Cut off |
Has a start time: Defines the earliest that this process can be accessed and data submitted by users within the given period. Cut off: Use this to define the cut-off for the process and track whether the submission happened in time. Leaving it blank makes the end of the chosen period as the default cut-off. Reminders get scheduled against the defined cut-off or the end of the chosen period |
||
|
Geo Location VAS* |
Available only when coverage is ‘Store’ or ‘Unit’ By invoking this option, you can enable geo-tracking and/ or geo-fencing on the process, i.e. define that submissions should be made from within the location and whether a submission cannot be made from outside the perimeter or can be made but will be reported as non compliant. To use this feature meaningfully, make sure that you have mapped the Latitude and Longitude of all your Business units during Unit creation |
||
|
Enable Data Edit |
This does not by default make all fields editable in the process but enables an Edit option on all Tasks within the process |
||
|
Only Camera Evidence |
By enabling this option, you can disable all attachment options on the entire process, except live pictures clicked from the camera. Leave this blank if you would prefer to make this choice at an individual Task level within process. |
||
|
End Date |
Your Wooqer processes are perpetual in nature and can be deactivated any time you desire. However, for short lived processes, you have an option to pre-define the End date. The process will be automatically deactivated on this date. You will have an option to change the End date and reactivate the process if desired. |
||
|
Group Code |
Yes |
You can create a new group or use an existing one for easy accessibility of processes. To create a new group you will have to enter three Alphanumeric characters in the first field, once done, then you'll see an option to key in the title of the group in a small dialog box which appears instantly after keying in the data in the first field. If you leave this field blank, the process will by default end up in a default group called 'Others'. Group code cannot be changed once data is received on the process. |
Save the Properties and go to to Build the template
A. Define the structure
1. Add Section(s) if needed
2. Add Sub-section(s) if needed
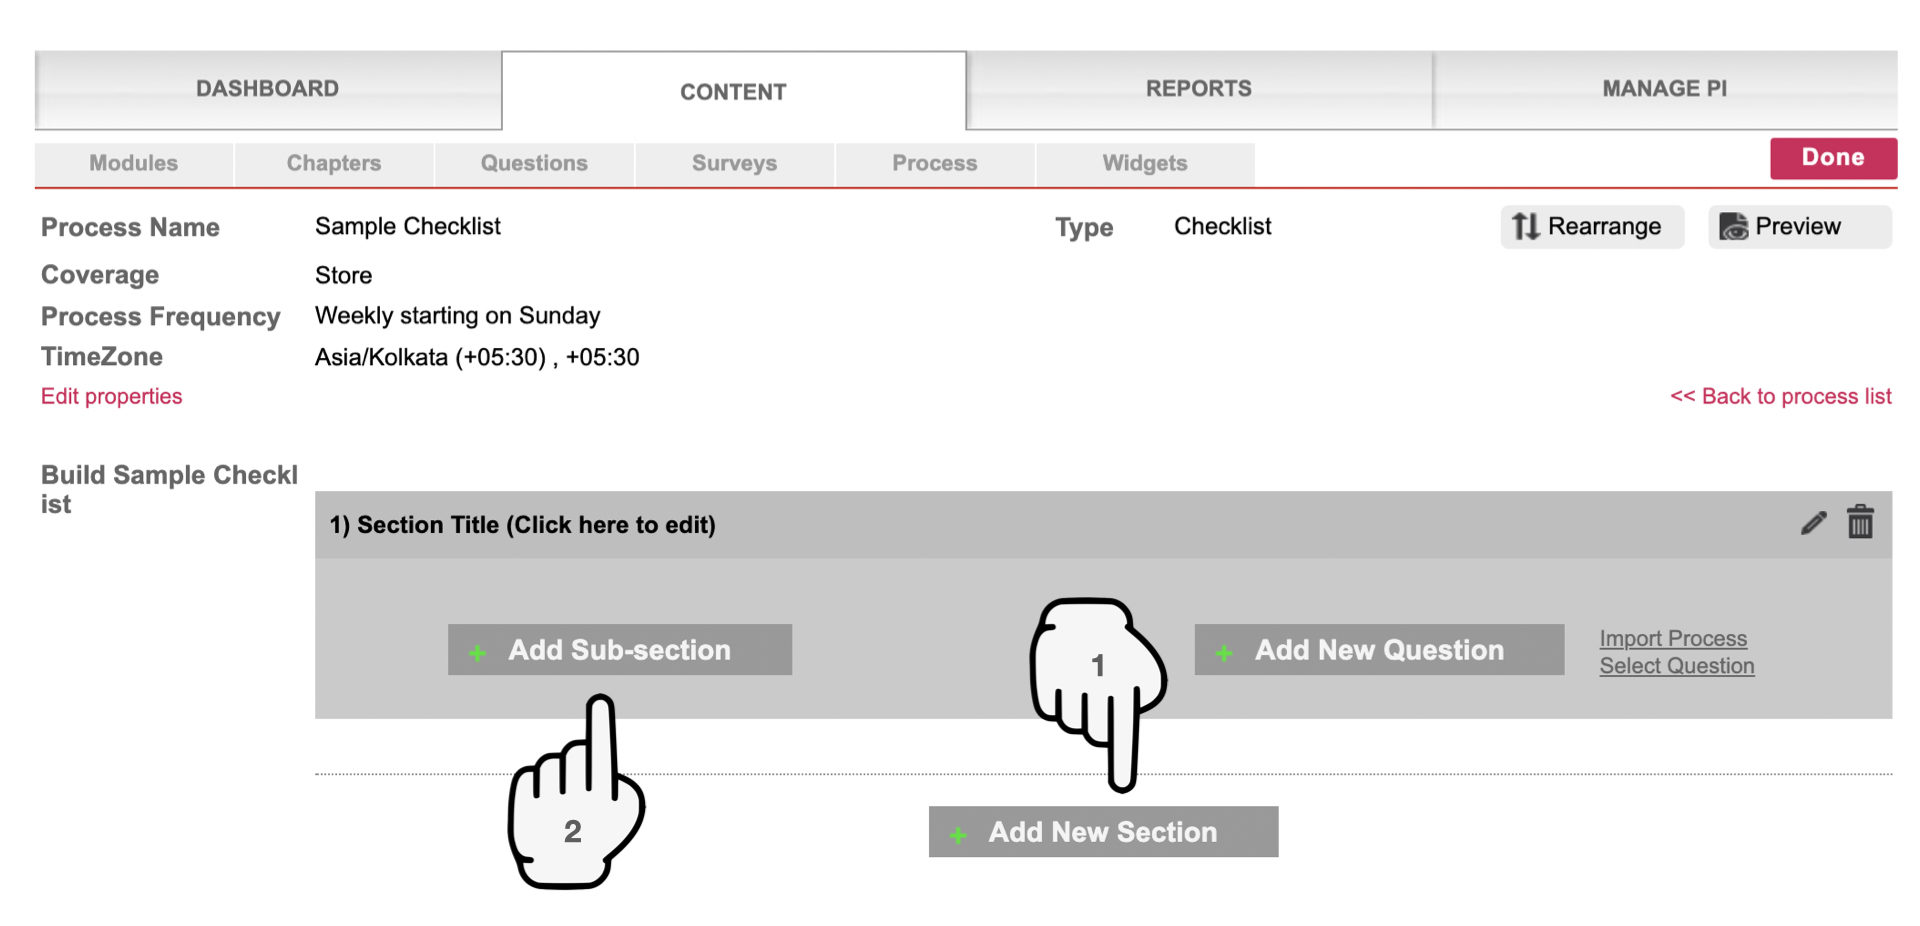
B. Add Questions in the desired section/ sub-section and configure Question Properties
1. Add Question : You can add only Checklist type questions in a Checklist. Click here to learn more about other question types and where you can use them
2. Define Question Properties - Click here to learn about Question properties

Need to make changes to your App? Click here to learn how to Edit your App
Click on the 'Done' button at the top or bottom right corner to save your changes and go on to Assign the App
You are now ready to go live with your WorkApp.
Your WorkApp can have 3 types of participants:
1) Assignees - All users who you 'Assign' the App to, are called assignees. Assignees participate by submitting information on the App
2) Report viewers - People who you 'Share' the report with can see data submitted by 'Assignees' for 'Coverages' for which report has been shared with them
3) Actioners - If you have enabled the 'Requires Action' property on your process to convert it into a workflow, the Assignee will submit the information to an 'Actioner' who would need to review the information and take further action on it.
Click here to learn how to Assign and Share your WorkApp. But before you take it to others, assign it to yourself first to make sure that everything is working as expected.
Create Audit
Audit is the examination or inspection of various processes by an auditor followed by physical checking of inventory to make sure that all departments are following documented guidelines. It is done to ascertain the accuracy of tasks performed by the employees.
When to use this building block
In Audits questions and answers can have weightage. Adherence is auto-computed based on the responses. Use this for auditing locations or activities.
Inclusions
Questions: MCQ, Short, Descriptive, Score, Rating, Dependent
Process properties: All Coverage's, Timezone, Occurrence, Cut-off, Data Edit, Geo-compliance, Duplicates, Only Camera Evidence, Multiple Records, Maximum Score, End Date, Group Code, System Calculated Score
Exclusions
Questions: Drop-down select, NPS, Location
Use cases
Ops Audit, Legal Audit, Quality Audit
Click on Content->Process -> Add New
Process Type - Audits
Process Name - Give the name for the App to be created. The name can be upto a maximum of 25 characters.
Click on 'Continue' to start configuring App properties
|
Property |
Mandatory |
Editability |
Description |
|
Process Name |
Yes |
Change any time |
You can change the name of the WorkApp. The name can be upto a maximum of 25 characters |
|
Process Objective |
Yes |
Change any time |
As new people access this WorkApp to submit information, the objective helps them understand the purpose giving them context to start using the WorkApp. |
|
Instructions |
Change any time |
Add instructions for new users to understand how to use the WorkApp |
|
|
Coverage |
Can change coverage type till first submission Can add more coverages any time Can remove coverage till data is received against it |
"Coverage" defines the index entity against which data is stored and maintained on Wooqer. User submitting data or accessing reports may change over time, but the index entity to which the data is linked is perpetual. You can choose from Cities, Units, Modules, Users, Process, Resources and Others. Remember to click on 'Select ' after choosing the Coverage type. Coverage cannot be changed once data is received. |
|
|
Occurrence |
Yes |
Can change till first submission |
Configure whether the Process is going to be "One time" or "Recurring". Occurrence cannot be changed once data is received. |
|
Timezone |
Yes |
Change any time |
Select the Time zone in which the process shall be run/ managed from. Cut-off time will be calculated as per this time zone. |
|
Periodicity |
Yes |
Can change till first submission |
This field gives you an option to select how often this Process repeats itself. You can choose from daily, weekly, monthly, quarterly, half-annually, annually or set a custom frequency. Periodicity cannot be changed once data is received. |
|
Cut off |
Has a start time: Defines the earliest that this process can be accessed and data submitted by users within the given period. Cut off: Use this to define the cut-off for the process and track whether the submission happened in time. Leaving it blank makes the end of the chosen period as the default cut-off. Reminders get scheduled against the defined cut-off or the end of the chosen period |
||
|
Geo Location VAS* |
Available only when coverage is ‘Store’ or ‘Unit’ By invoking this option, you can enable geo-tracking and/ or geo-fencing on the process, i.e. define that submissions should be made from within the location and whether a submission cannot be made from outside the perimeter or can be made but will be reported as non compliant. To use this feature meaningfully, make sure that you have mapped the Latitude and Longitude of all your Business units during Unit creation |
||
|
Enable Data Edit |
This does not by default make all fields editable in the process but enables an Edit option on all Tasks within the process |
||
|
Duplicates |
The default setting on Wooqer is that only one submission can be received against a given coverage in a given period. Enabling duplicates allows more than one person to make a submission on the same coverage within the same period. For example: if the coverage is 'Unit', the periodicity - 'Monthly' and the process- a 'Unit audit' is assigned to both the Area Manager and Regional Manager of the unit, then both can audit this unit once in the same month. In such a scenario, you have an option to get a summary report with average, individual scores, lowest or highest score. Duplicates cannot be disabled once data is received. |
||
|
Only Camera Evidence |
By enabling this option, you can disable all attachment options on the entire process, except live pictures clicked from the camera. Leave this blank if you would prefer to make this choice at an individual Task level within process. |
||
|
Multiple records |
The default setting on Wooqer is that only one submission can be received against a given coverage in a given period. By enabling Multiple records, you can allow multiple users to make multiple submissions for the same process within the same period, removing all restrictions. Multiple records cannot be disabled once data is received on the process. |
||
|
Hide Question tag |
Use this to decide whether you want to show Questions tags to the user when filling the audit, or keep them only visible in reports, reducing clutter/ distraction for the auditor. |
||
|
End Date |
Your Wooqer processes are perpetual in nature and can be deactivated any time you desire. However, for short lived processes, you have an option to pre-define the End date. The process will be automatically deactivated on this date. You will have an option to change the End date and reactivate the process if desired. |
||
|
Maximum Score |
You have an option to predefine a Maximum score as you start mapping your process on Wooqer. You will not be able to activate the process if the actual score is different from this Maximum score. |
||
|
Group Code |
Yes |
You can create a new group or use an existing one for easy accessibility of processes. To create a new group you will have to enter three Alphanumeric characters in the first field, once done, then you'll see an option to key in the title of the group in a small dialog box which appears instantly after keying in the data in the first field. If you leave this field blank, the process will by default end up in a default group called 'Others'. Group code cannot be changed once data is received on the process. |
Save the Properties and go to to Build the template
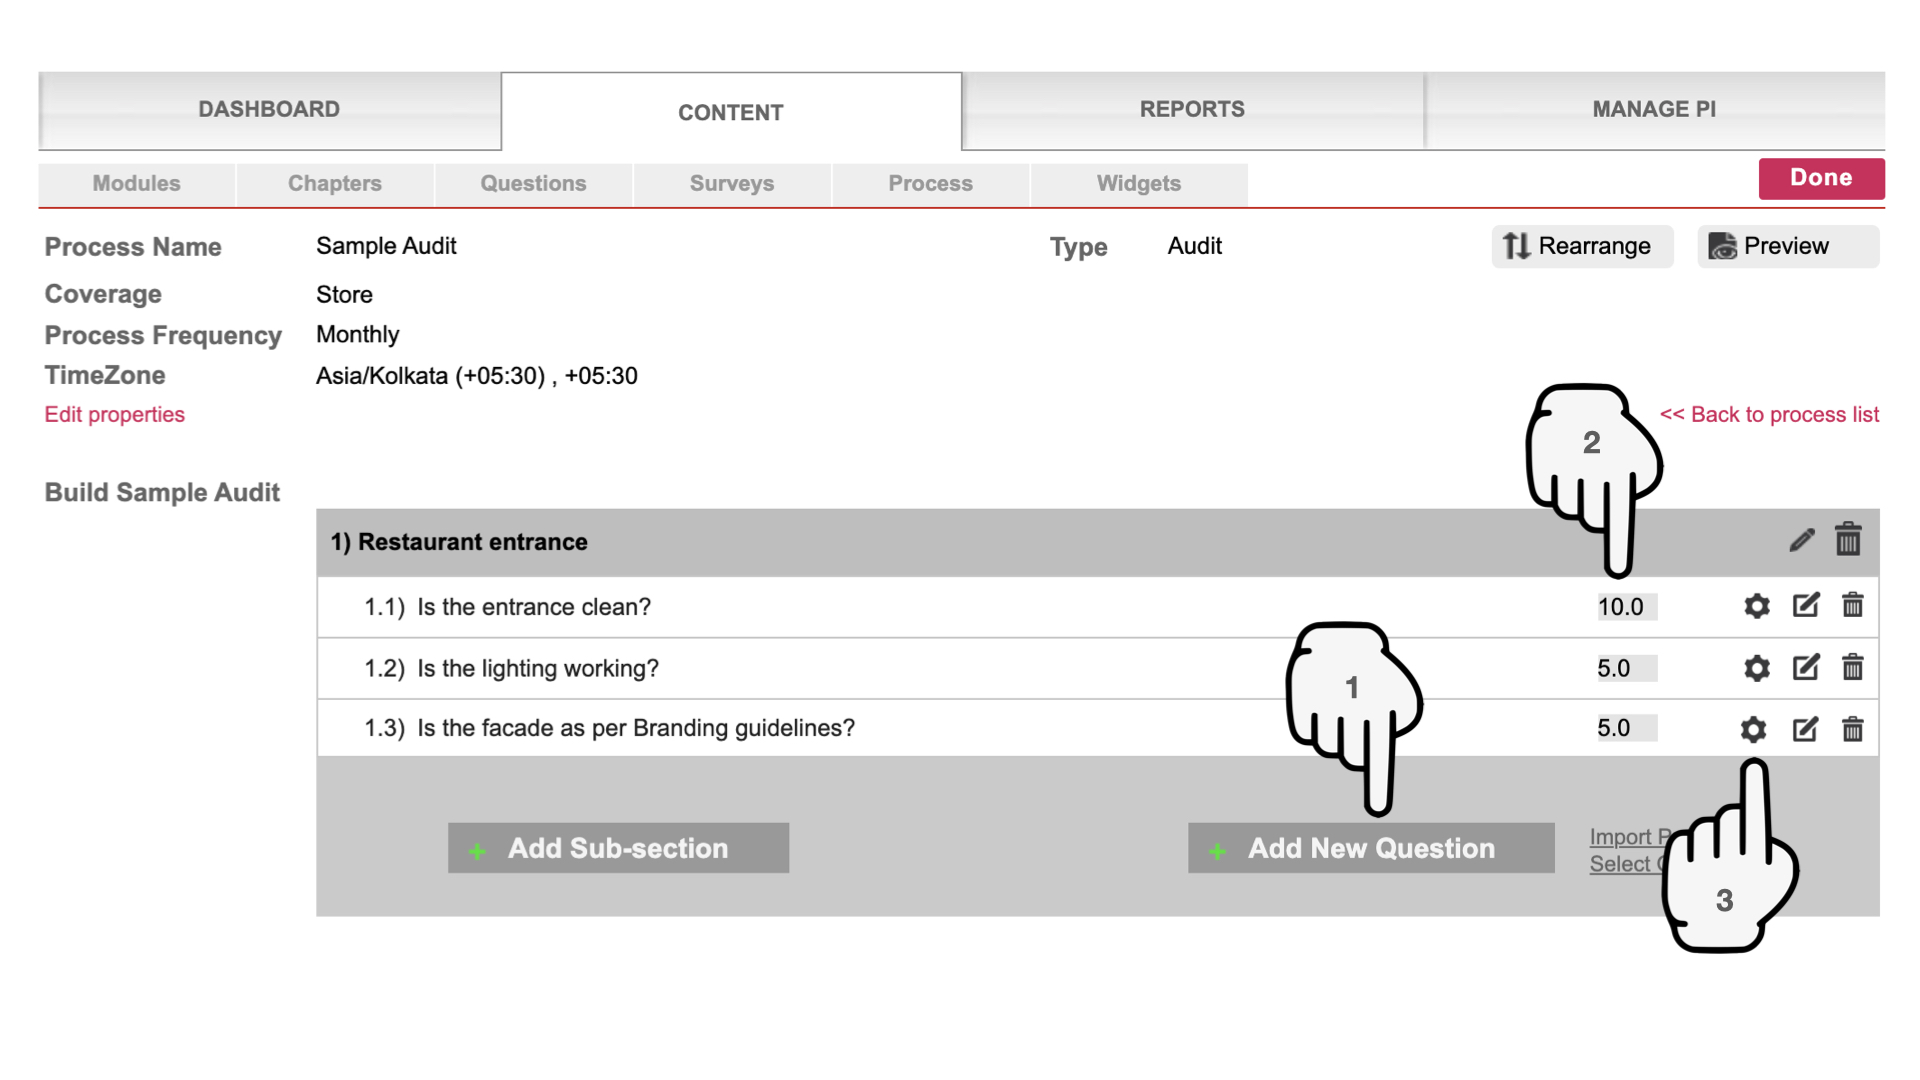
A. Define the structure
1. Add Section(s) if needed
2. Add Sub-section(s) if needed
B. Add Questions in the desired section/ sub-section and configure Question Properties
1. Add Question : Click here to learn about Questions and choose the right one
2. Define Question Weightage : This weightage shall be used for calculating the Audit Score.
3. Define Question Properties - Click here to learn about Question properties
Need to make changes to your App? Click here to learn how to Edit your App
Click on the 'Done' button at the top or bottom right corner to save your changes and go on to Assign the App
You are now ready to go live with your WorkApp.
Your WorkApp can have 3 types of participants:
1) Assignees - All users who you 'Assign' the App to, are called assignees. Assignees participate by submitting information on the App
2) Report viewers - People who you 'Share' the report with can see data submitted by 'Assignees' for 'Coverages' for which report has been shared with them
3) Actioners - If you have enabled the 'Requires Action' property on your process to convert it into a workflow, the Assignee will submit the information to an 'Actioner' who would need to review the information and take further action on it.
Click here to learn how to Assign and Share your WorkApp. But before you take it to others, assign it to yourself first to make sure that everything is working as expected.
Create Assessment
Assessments can be used to assess someone knowledge & understanding related to a particular topic.
When to use this building block
Create your own question bank and randomize these questions for automated assessments. Set minimum scores to clear assessments. Use this for all types of e-tests.
Inclusions
Questions: MCQ, Short, Descriptive
Process properties: Roles Coverage, Timezone, Occurrence, Cut-off, Timer, Start Date, End Date, Randomize Questions, Hide Results, Maximum Attempts, Maximum Score, Success Threshold, Group Code, System Calculated Score
Exclusions
Questions: Score, Rating, Drop-down select, Dependent, NPS, Location
Process properties: Non Role Coverages, Data Edit, Duplicates, Only Camera Evidence, Multiple Records, Question Tag
Use cases
Tests, Quizzes, Contests, Product Knowledge Assessments
Sample Report
Click on Content->Process -> Add New
Process Type - Assessment
Process Name - Give the name for the Assessment to be created. The name can be upto a maximum of 25 characters.
Click on 'Continue' to start configuring App properties
|
Property |
Mandatory |
Editability |
Description |
|
Process Name |
Yes |
Change any time |
You can change the name of the Assessment. The name can be upto a maximum of 25 characters |
|
Process Objective |
Change any time |
Define the objective of the Assessment. It will be visible to users before starting the Assessment |
|
|
Instructions |
Change any time |
Add instructions that users can see when starting the assessment |
|
|
Lock Roles |
You can add roles later |
Once a role is locked to an assessment (strongly recommended for recurring assessments) all current users mapped to that role and all new users mapped to that role will have the assessment assigned to them automatically |
|
|
Occurrence |
Yes |
Can be changed till first submission |
Configure whether this is done time assessment or you want to run it periodically |
|
Time zone |
Yes |
Can be changed till first submission |
Select the Time zone for the assessment. Your Time Zone will be picked by default. Cutoff time will be calculated as per this time zone. |
|
Periodicity |
Yes |
Can be changed till first submission |
This field defines the frequency at which the assessment will run, if periodic. You can choose from daily, weekly, monthly, quarterly, half-annually, annually or set a custom frequency. |
|
Duration |
Can change duration any time, but Timed status cannot be changed after first submission |
You can set amount of time available to the assignee once he/she starts the assessment. Countdown starts as soon as the form is opened. Assignees can save or submit a response till assessment time is up. The last saved response can also be submitted after time is up. Leaving it blank allows assignees to take as much time as they want Cut-off will enable you to set an End time of the Assessment for the chosen frequency. Once you check this box, you will need to key in the data against "Completion by" field below - wherein you can define "Days from start" and "Time" sections. |
|
|
End Date |
Change any time |
The assessment is auto-inactivated after the End date/ time and assignees cannot access it after this time. Leaving it blank means that it will stay active till you manually inactivate it |
|
|
Randomize |
Can be changed till first submission |
Randomize questions within a section to present different questions in different order to assignees. Randomization is most effective when the number of questions in the section is more than the number of questions to be presented to each assignee |
|
| Hide Assessment Result | Can be changed any time | The Assessment result is mailed to the user after completing the assessment. By hiding the assessment result, you can prevent this mail from going to the users and choose to publish results another way | |
| Maximum Attempts | Yes | Can be changed till first submission | Define the maximum attempts that a user can take. Additional attempts are allowed only if a user fails the assessment |
| Maximum Score | Yes | Can be changed till first submission | The total marks for the Assessment can be set using the "Maximum Score" option. Entering it here helps you ensure that marks given to each question add up to this number. |
| Success Threshold | Yes | Can be changed till first submission | Define the Pass percentage of the Assessment |
| Group Code | Cannot be defined. Always 'Others' | Assessments always go into the ‘Others’ Group. You can leave this blank |
A. Define the structure
1. Add Section(s) and Questions(s) as needed.
MCQs are the most recommended question type in an assessment as they can be automatically scored. An Assessment MCQ can have upto 4 answer options with one or more correct answer option defined to enable auto-scoring. If any other question type is included in an assessment, an evaluator needs to be defined, who shall be responsible for reviewing the answer and scoring it. Click here to understand additional Question Types
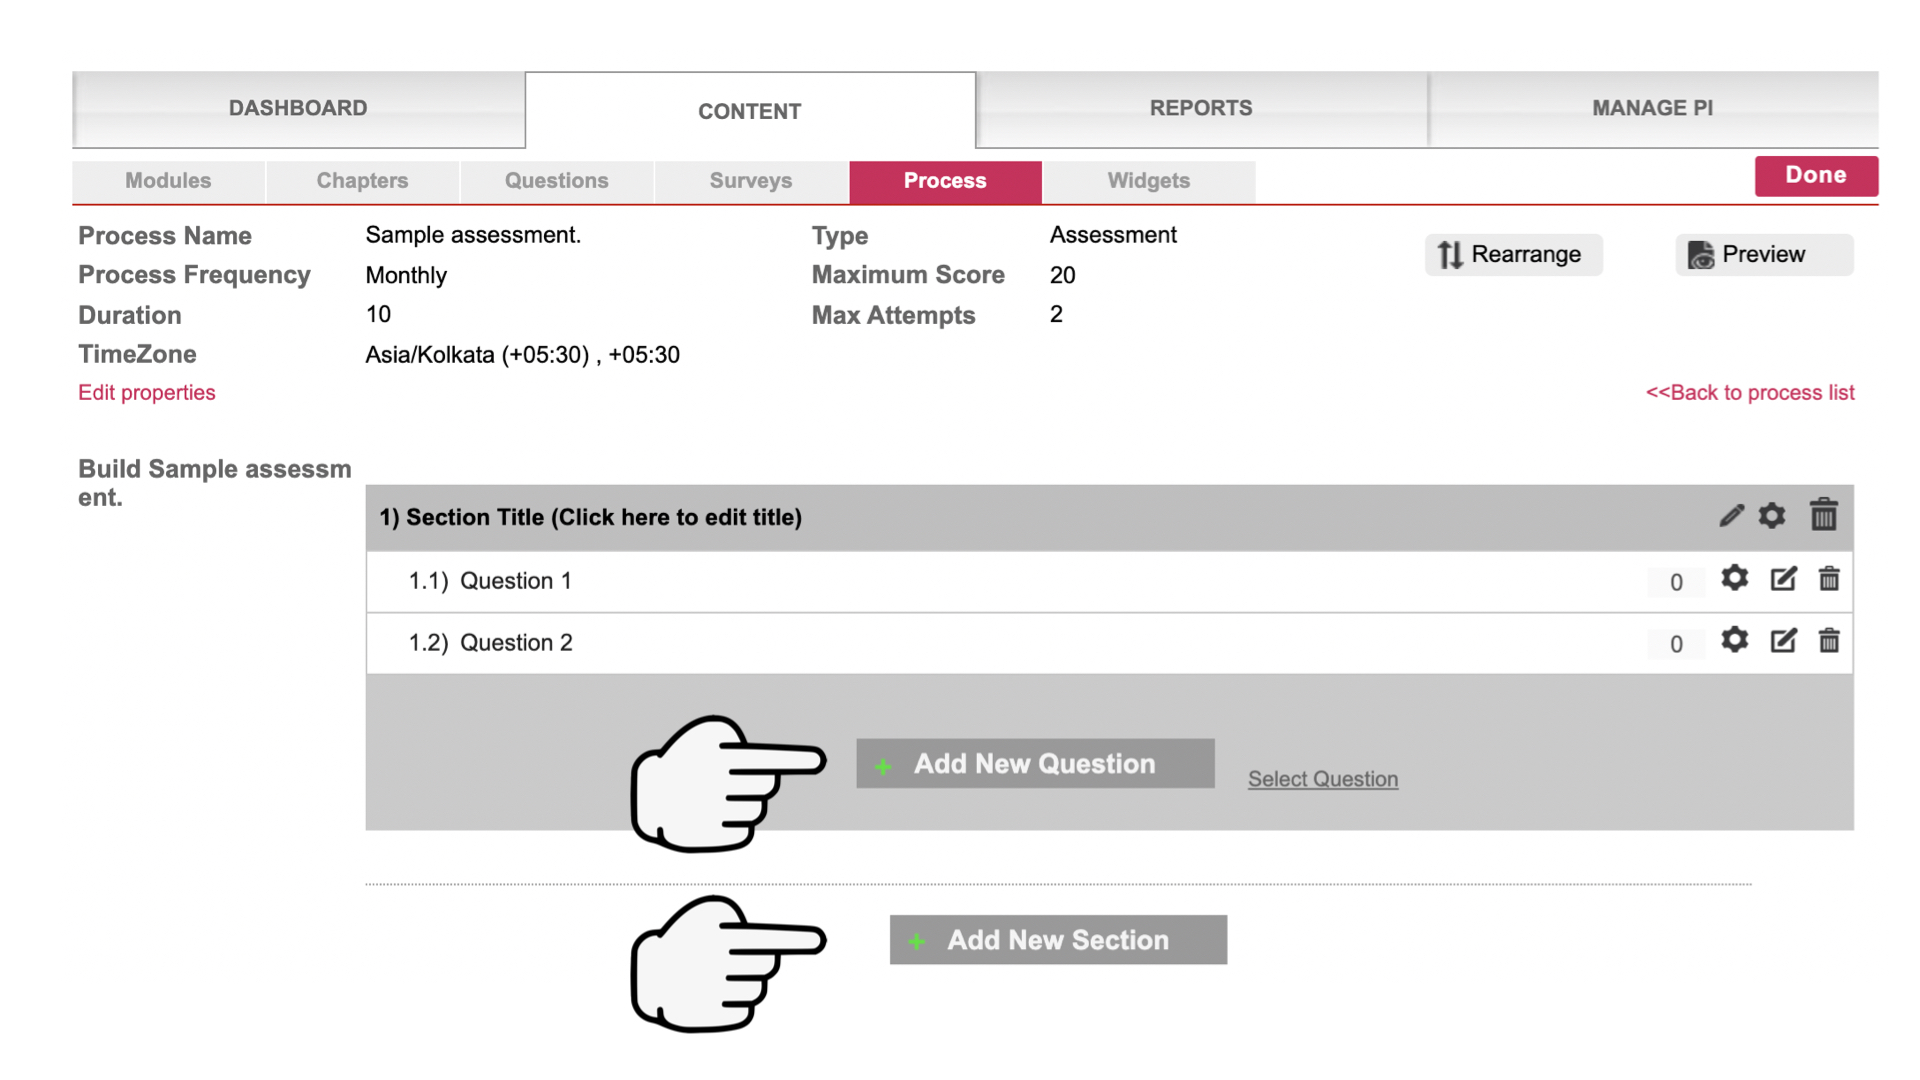
2. Configure Section Properties
You can decide to randomize specific sections. Once randomized, number of questions to be presented from the section and the score per question needs to be defined. Needless to say, each questions will have the same score
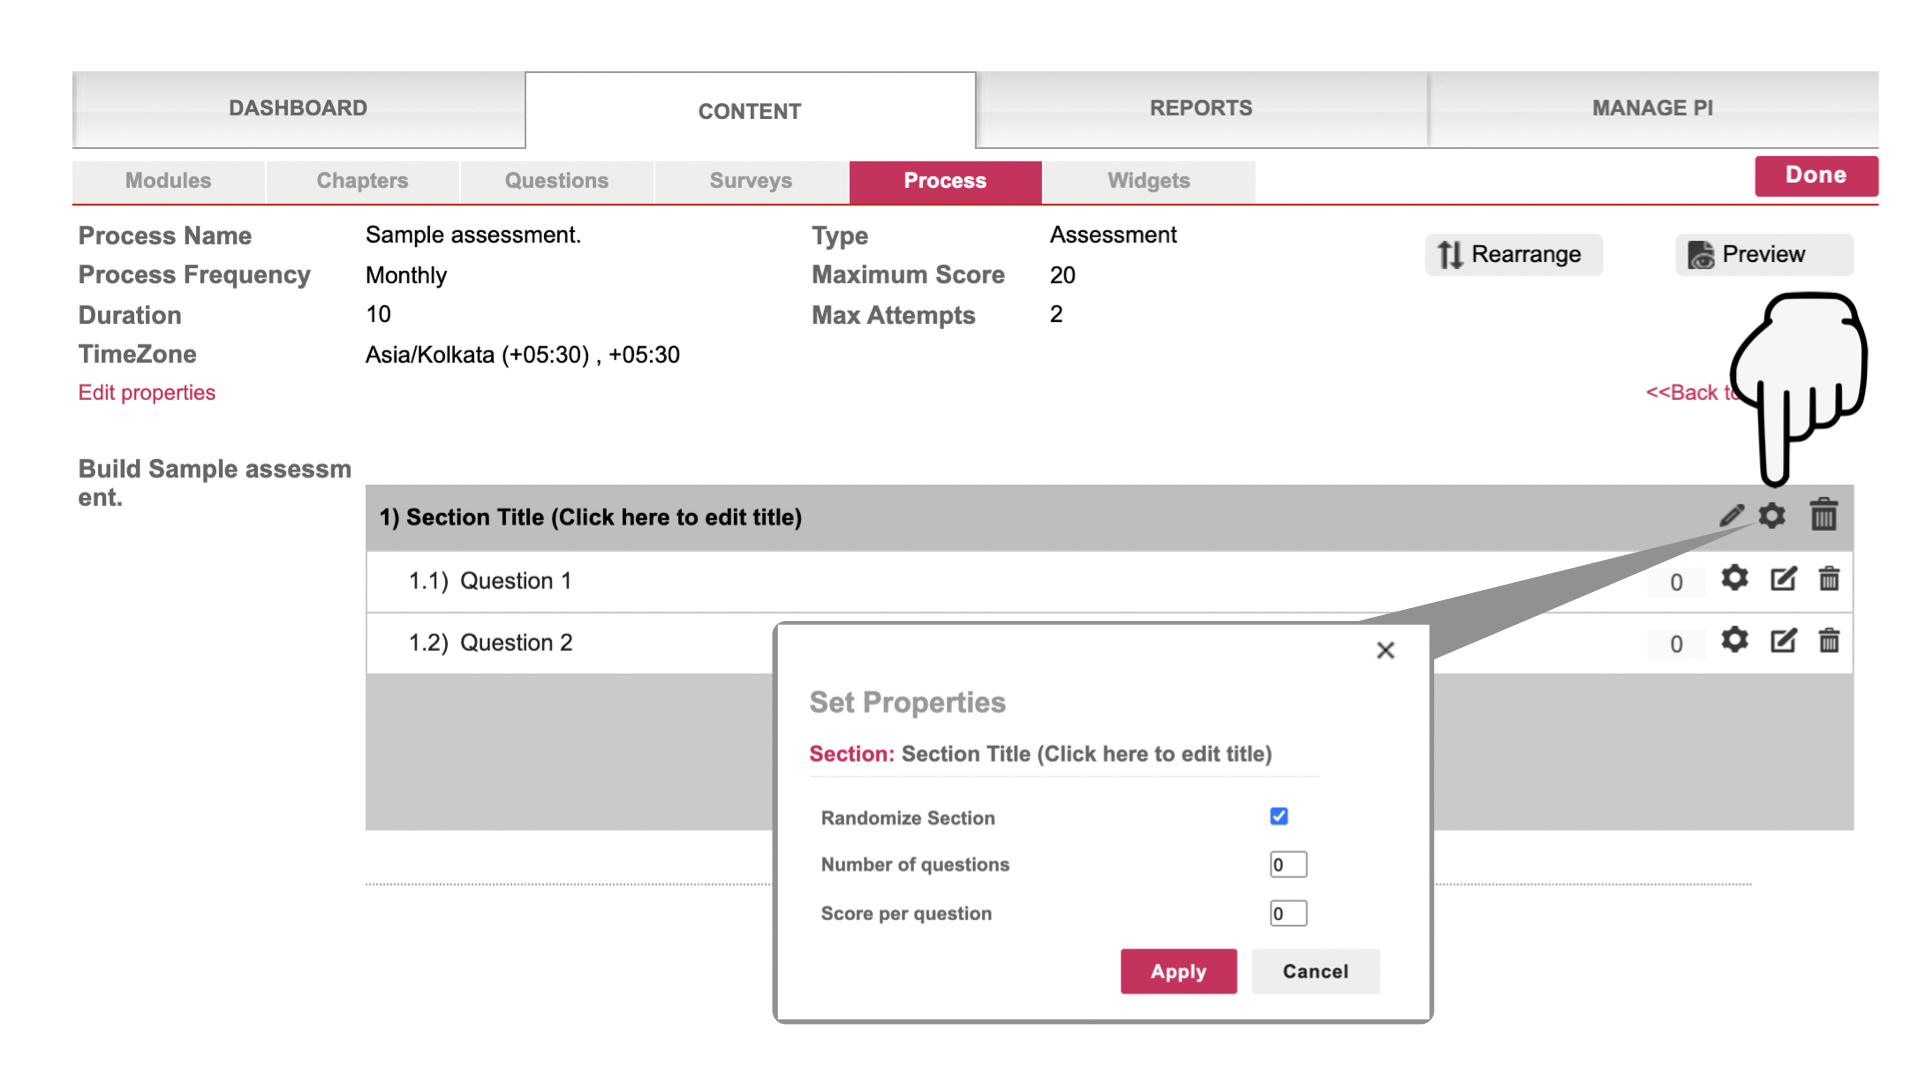
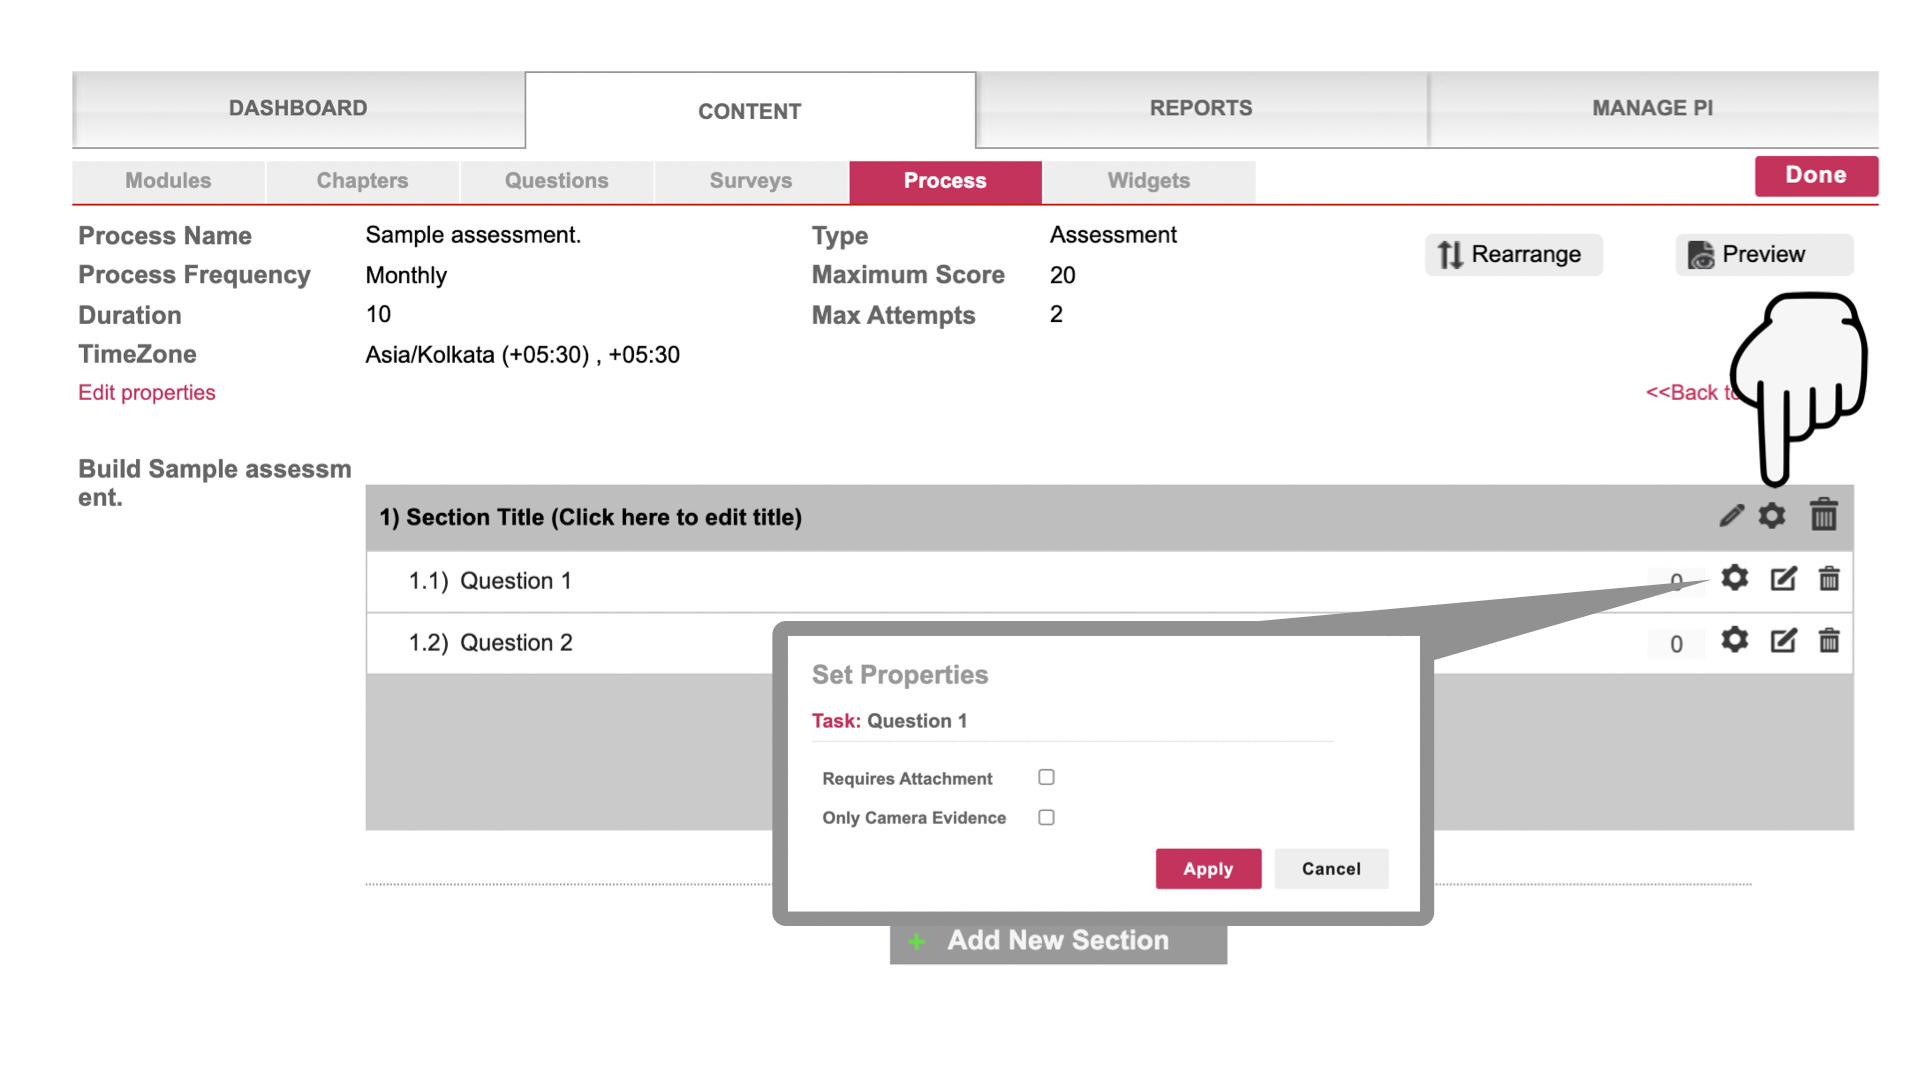
3. Configure Question Properties
If the section is not randomized, the score will be defined at a question level. You can also enable submission of an attachment and mandate for it to be a live camera picture only.
B. Add Questions in the desired section/ sub-section and configure Question Properties
1. Add Question : Click here to learn about Questions and choose the right one
2. Define Question Weightage : This weightage shall be used for calculating the Audit Score.
3. Define Question Properties - Click here to learn about Question properties
Need to make changes to your App? Click here to learn how to Edit your App
Click on the 'Done' button at the top or bottom right corner to save your changes and go on to Assign the App
You are now ready to go live with your Assessment
1. Click on the Assign icon against the assessment.
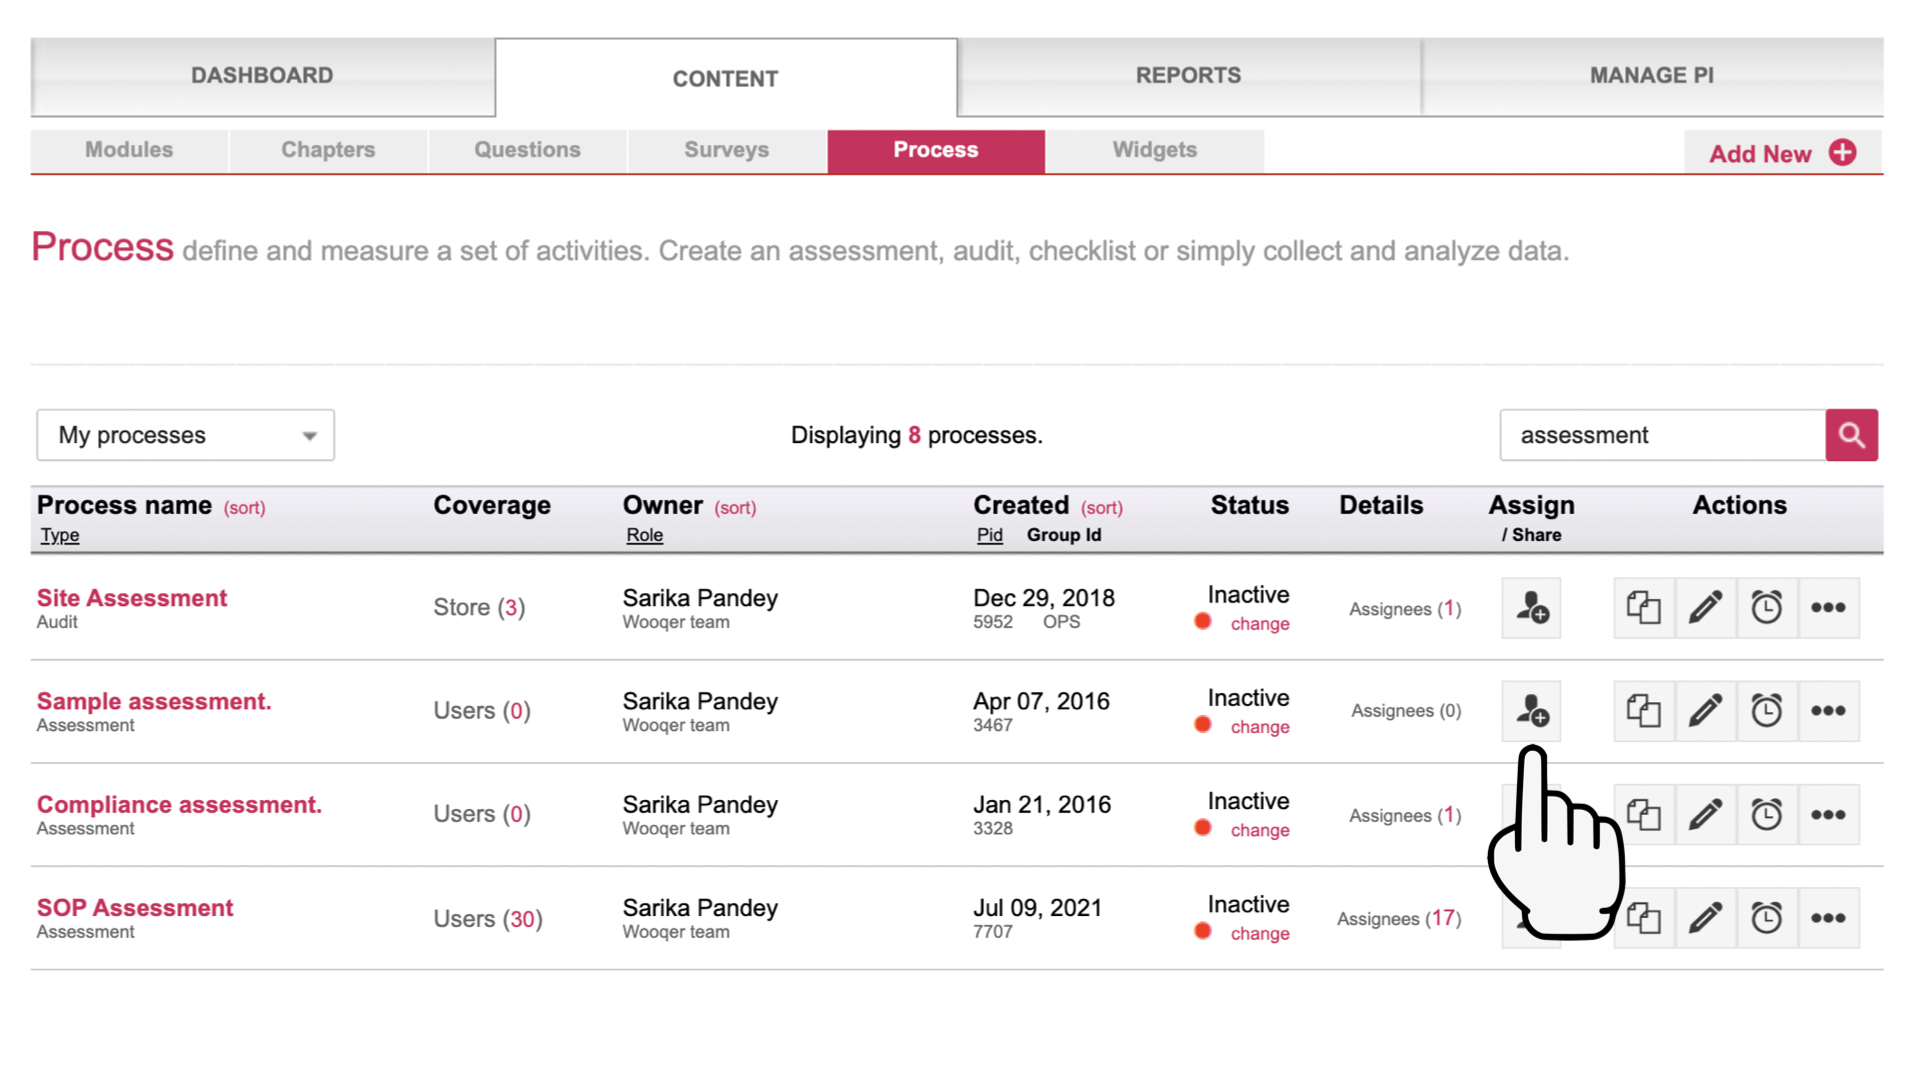
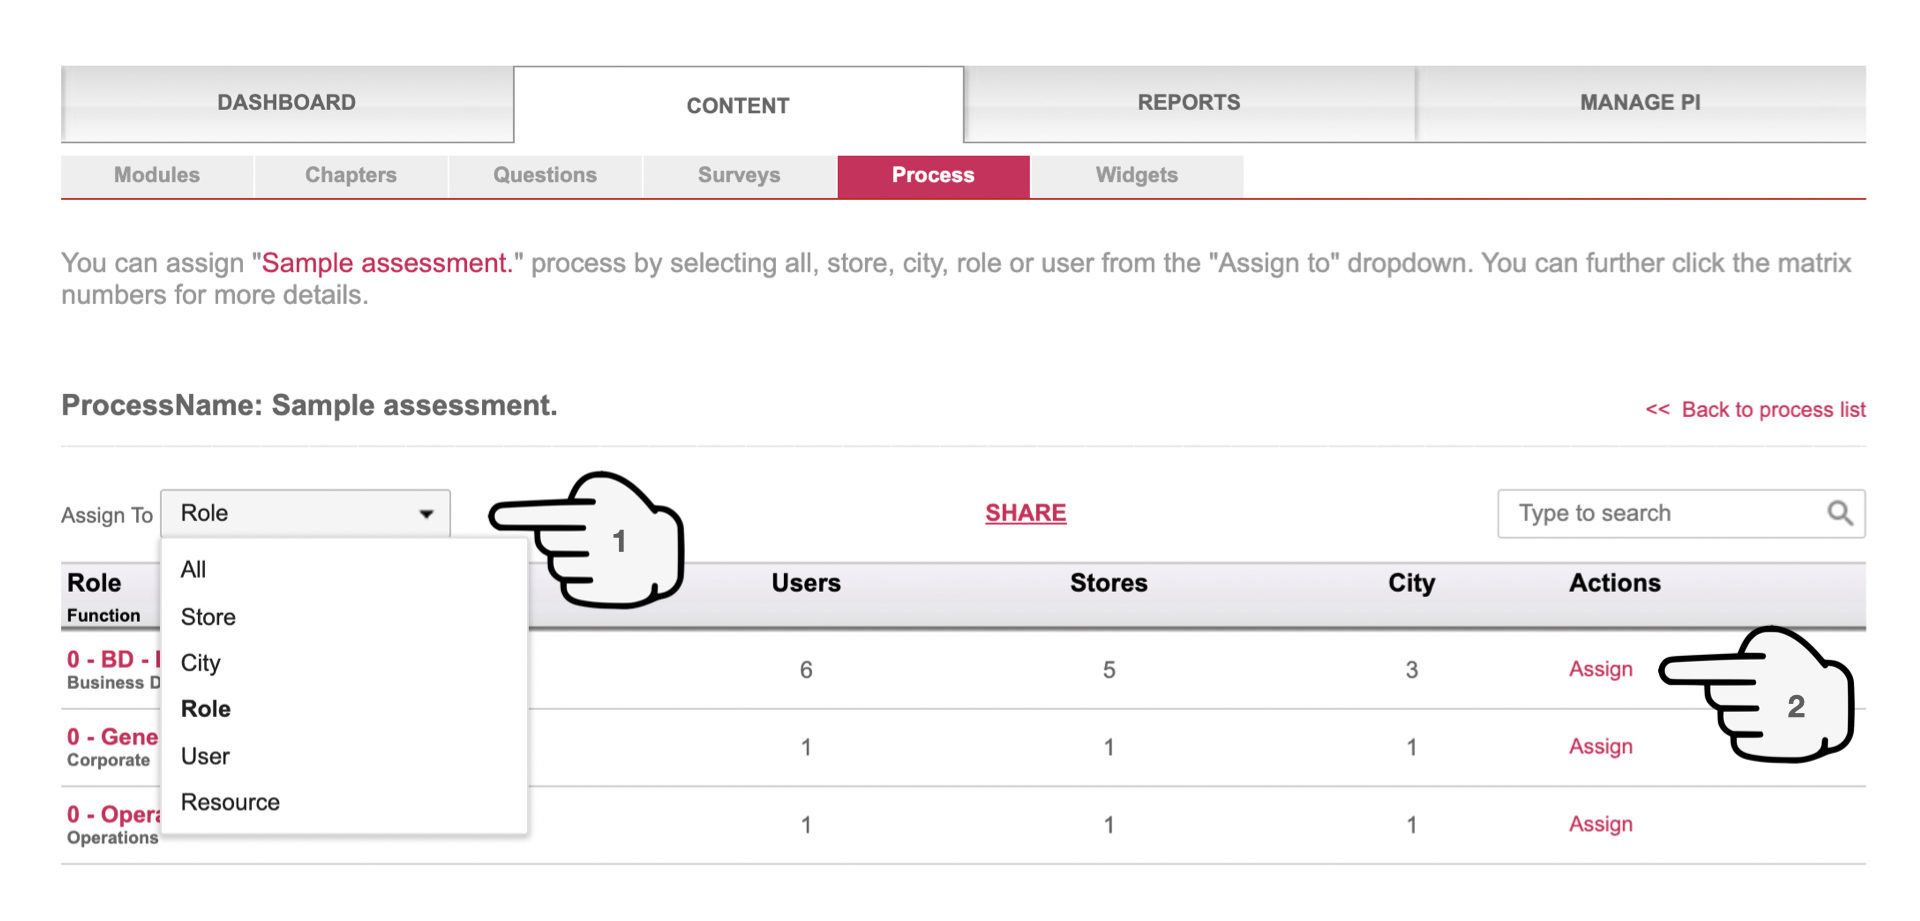
2. You can assign the Assessment to specific users or to people in a specific role, unit, city or grouped together as a Resource
3. Share Reports for the Assessment by clicking on the 'Share' button
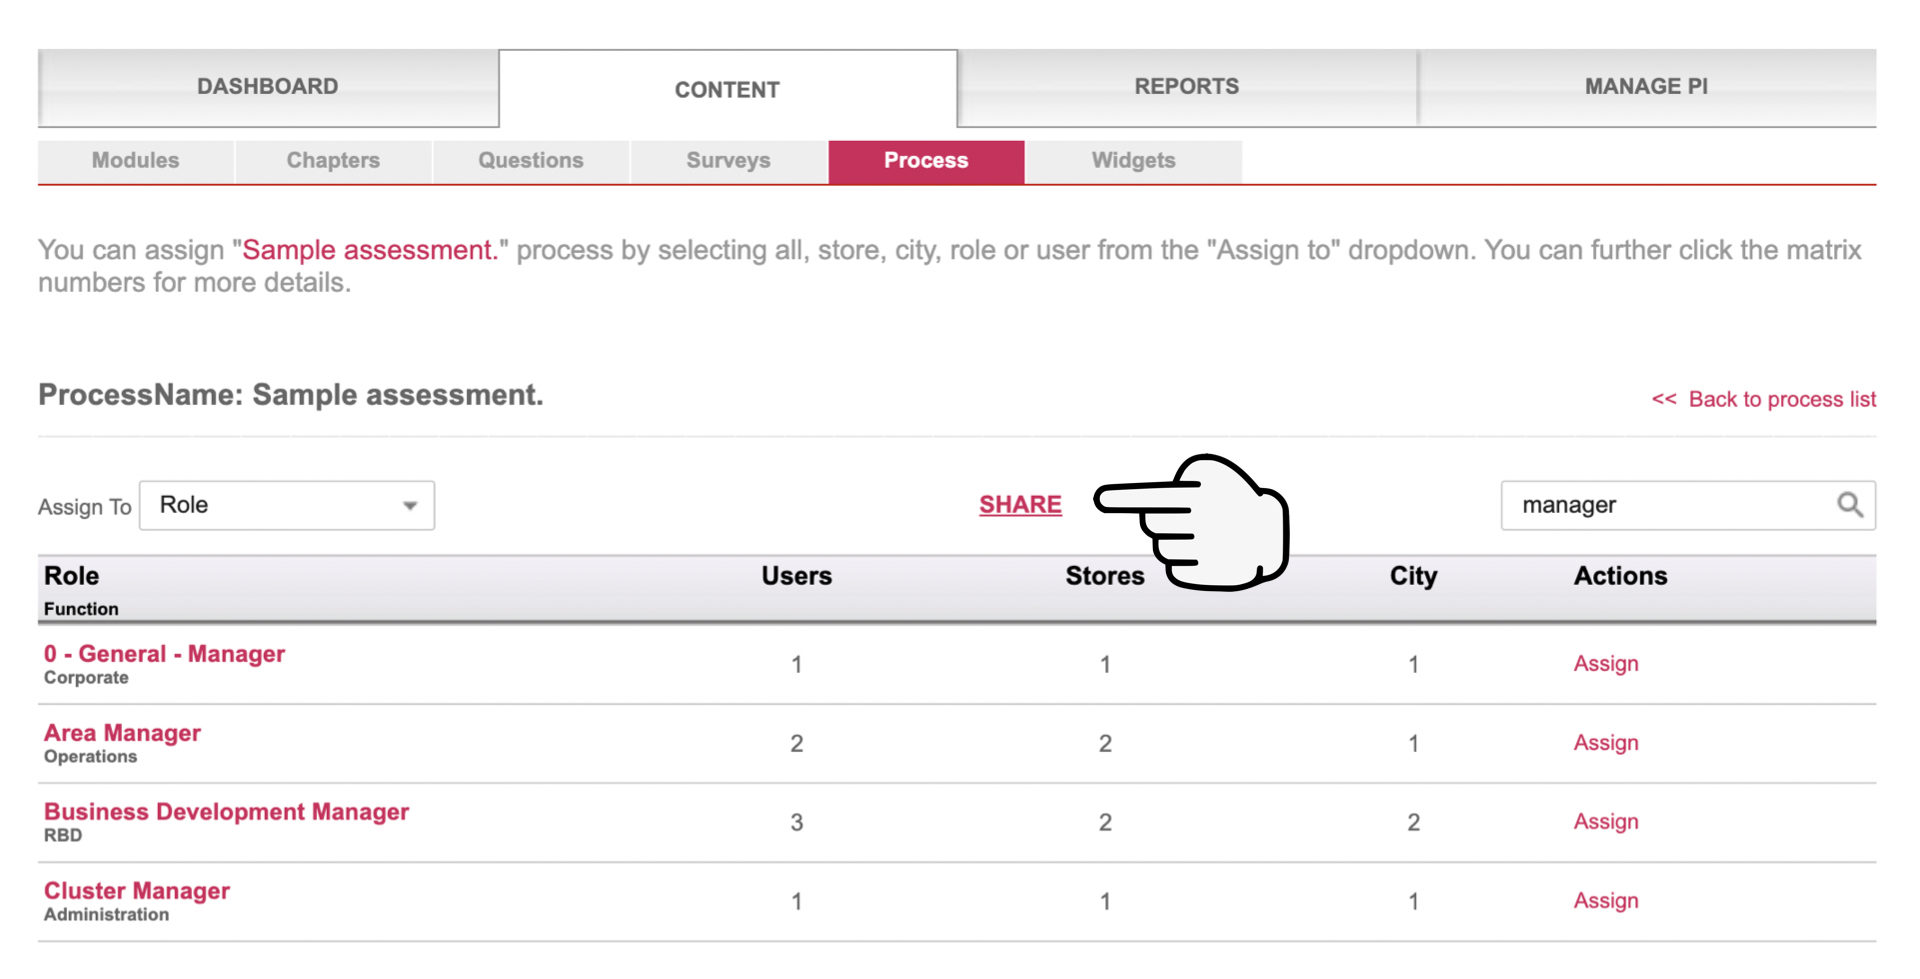
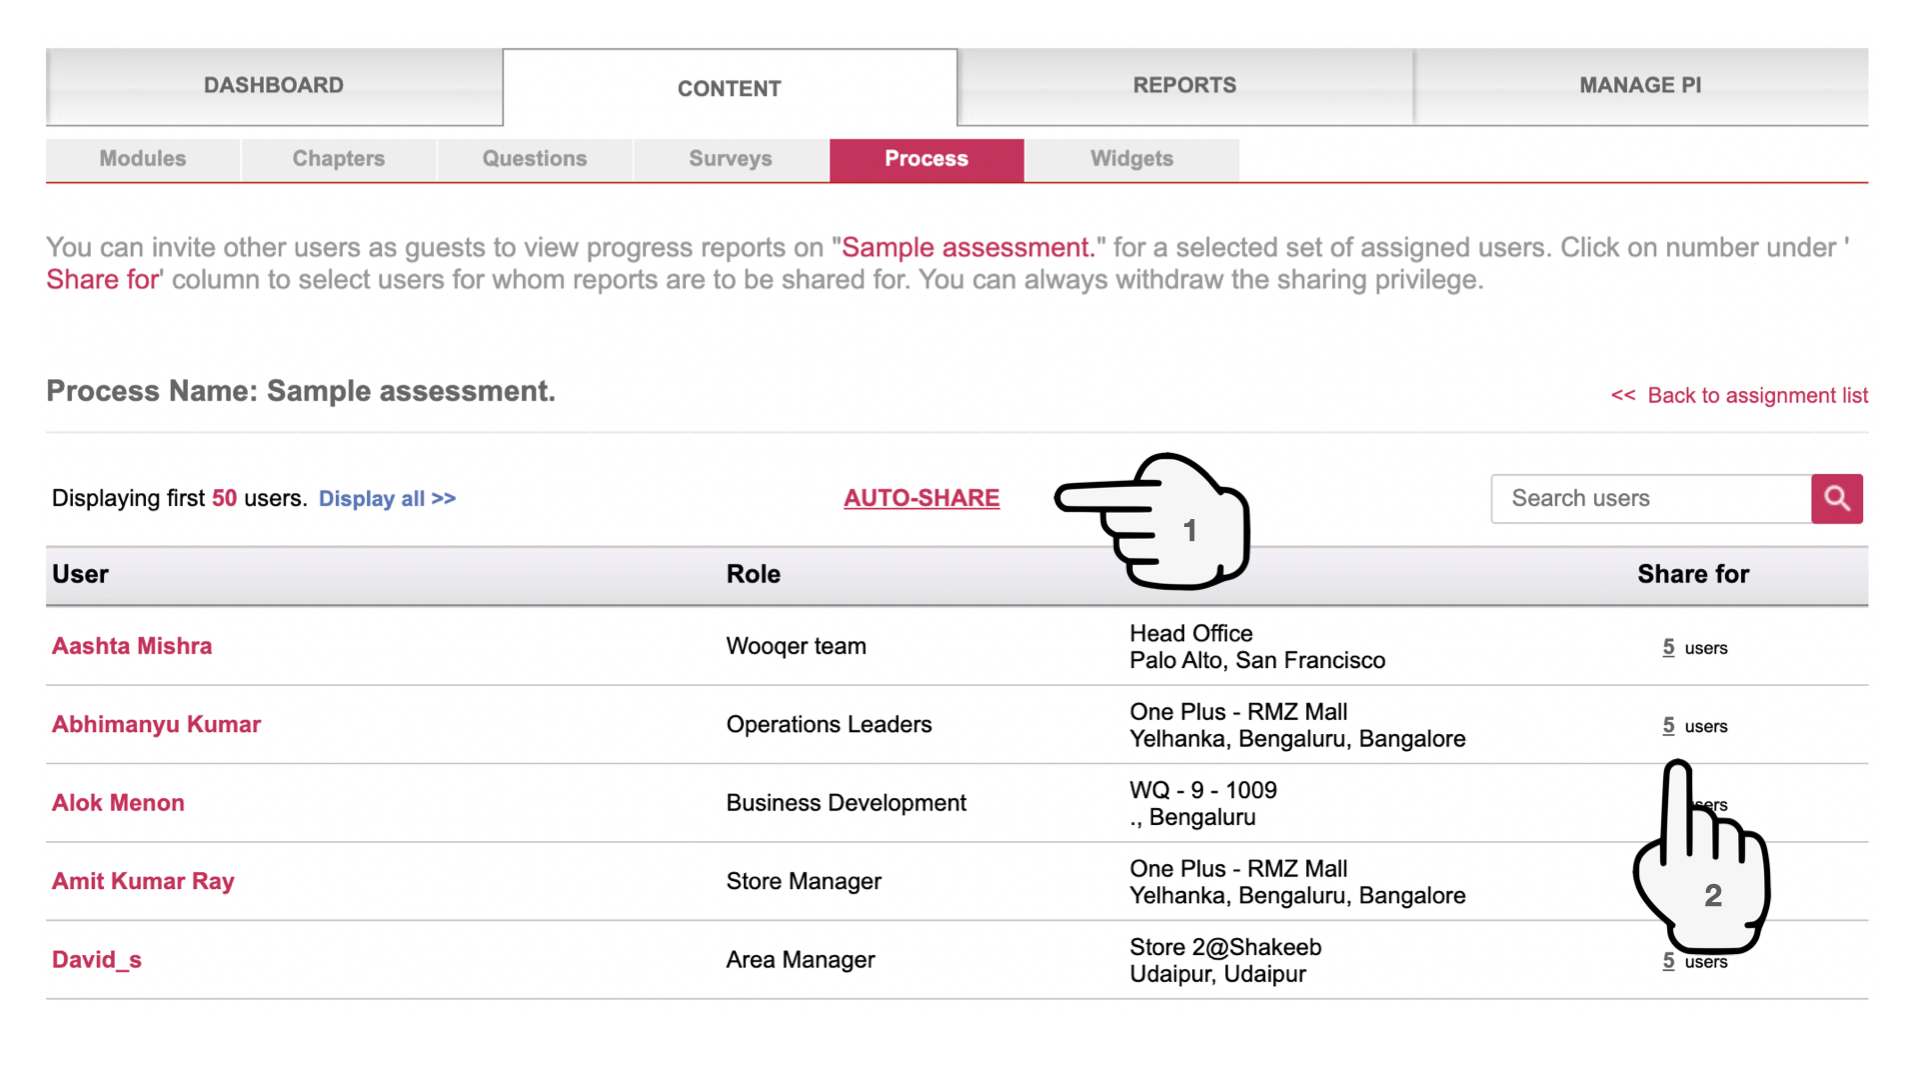
4. Share detailed reports for all users with themselves by clicking on 'Auto-share'. The overall score and ability to download a certificate is always available to them. Auto-share also makes the detailed question wise report available to them. To share report with a specific person in team like a Manager or someone helping you run the assessment, click on the number of users against the name of the person you wish to share the report with. Then select all people whose report you want the person to be able to see.
5. Set Evaluator
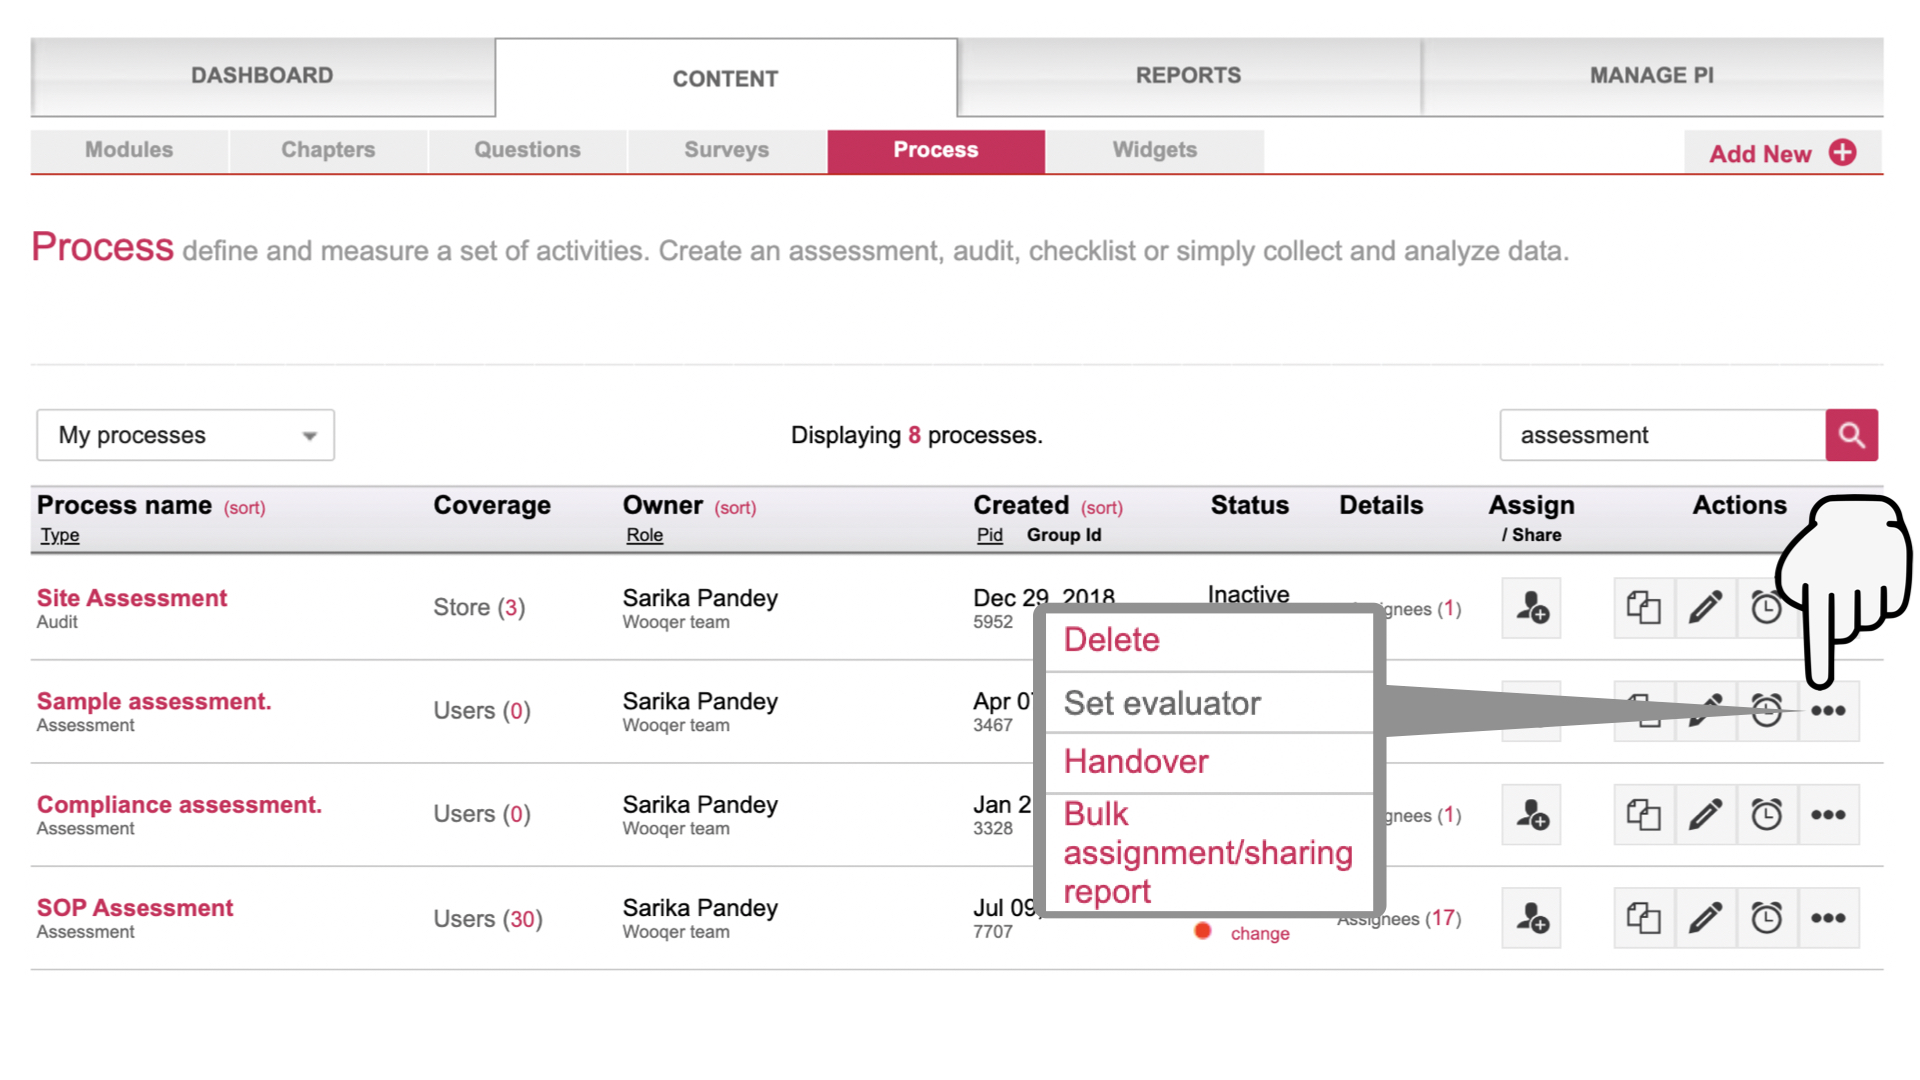
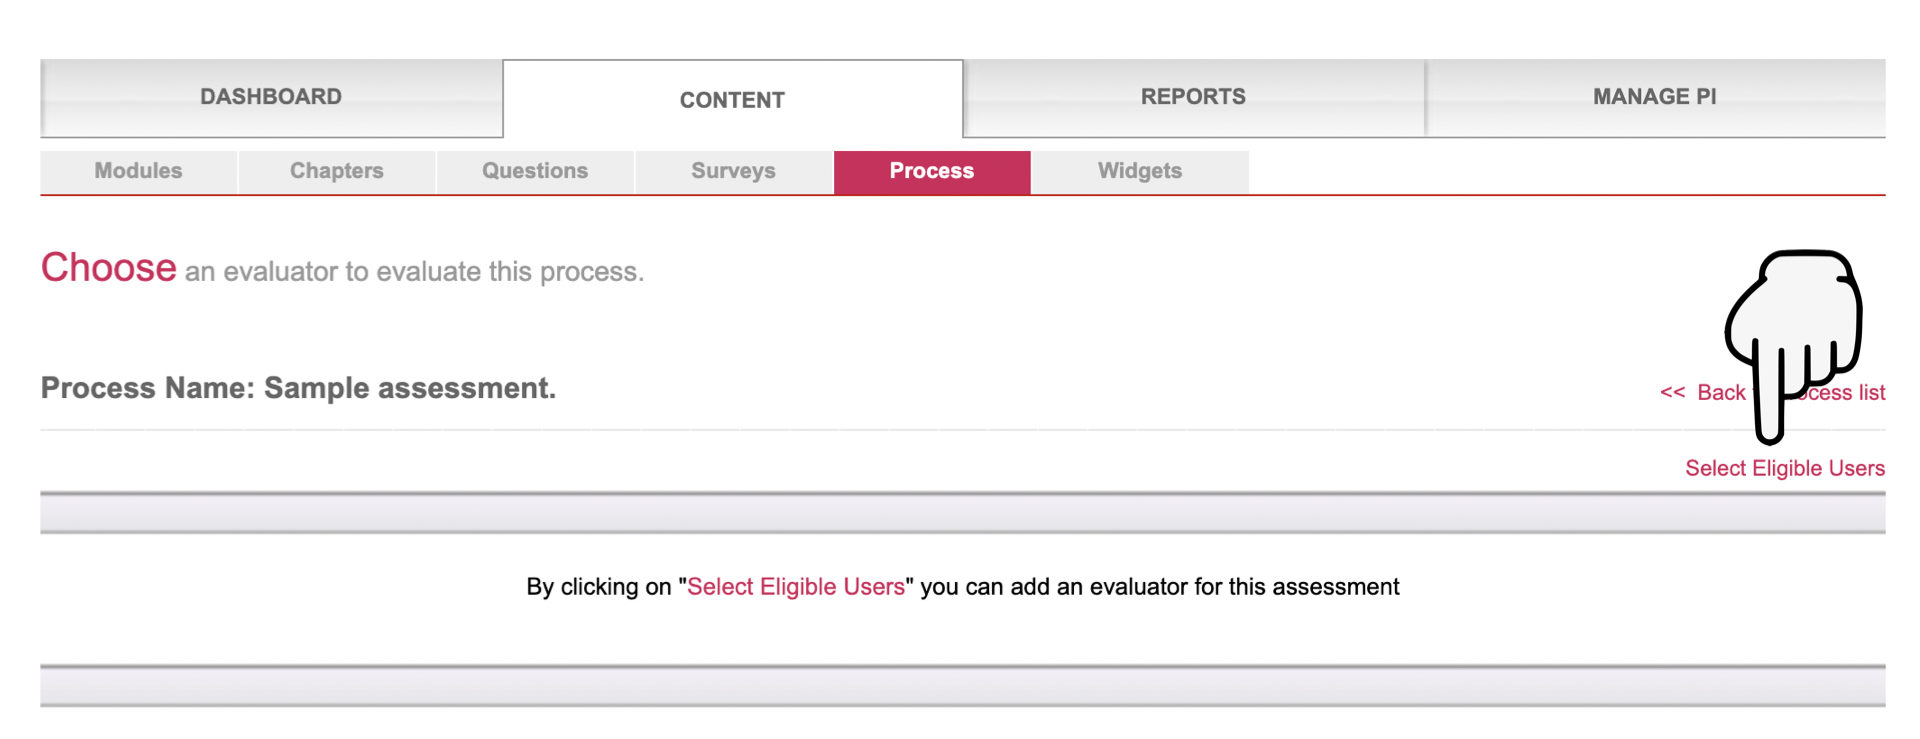
If you have added non MCQ questions in the assessment that can't be auto-evaluated, you will need to set an evaluator for the assessment who needs to evaluate and score these questions. Click on the Menu icon next to the assessment and then click on 'Select eligible users' to add a user . All assessments will get submitted to this person for evaluation.
Create Appraisal
Appraisal is the act of examining someone or something in order to judge their qualities, success, or needs.
When to use this building block
In Appraisals questions and answers can have weightage that can be used to arrive at a total score. You can use this for assessing people or any other entity
Inclusions
Questions: MCQ, Short, Descriptive, Score, Rating, Dependent
Process properties: All Coverage's, Timezone, Occurrence, Cut-off, Data Edit, Geo-compliance, Duplicates, Only Camera Evidence, Multiple Records, Maximum Score, End Date, Group Code, System Calculated Score
Exclusions
Questions: Drop-down select, NPS, Location
Process properties: Question Tag
Use cases
Employee Appraisals, Product Appraisals, Interview Feedback
Sample Report
Click on Content->Process -> Add New
Process Type - Appraisal
Process Name - Give the name for the App to be created. The name can be upto 40 characters
Click on 'Continue' to start configuring your process
| Property | Mandatory | Editability | Description |
| Process Name | Yes | Change any time | You can change the name of the WorkApp. The name can be upto a maximum of 40 characters |
| Process Objective | Yes | Change any time | As new people access this WorkApp to submit information, the objective helps them understand the purpose giving them context to start using the WorkApp. |
| Instructions | Change any time | Add instructions for new users to understand how to use the WorkApp | |
| Coverage |
Can change coverage type till first submission Can add more coverages any time Can remove coverage till data is received against it |
"Coverage" defines the index entity against which data is stored and maintained on Wooqer. User submitting data or accessing reports may change over time, but the index entity to which the data is linked is perpetual. You can choose from Cities, Units, Modules, Users, Process, Resources and Others. Remember to click on 'Select ' after choosing the Coverage type. Coverage cannot be changed once data is received. | |
| Occurrence | Yes | Can change till first submission | Configure whether the Process is going to be "One time" or "Recurring". Occurrence cannot be changed once data is received. |
| Timezone | Yes | Change any time | Select the Time zone in which the process shall be run/ managed from. Cut-off time will be calculated as per this time zone. |
| Periodicity | Yes | Can change till first submission | This field gives you an option to select how often this Process repeats itself. You can choose from daily, weekly, monthly, quarterly, half-annually, annually or set a custom frequency. Periodicity cannot be changed once data is received. |
| Cut off | Can change any time |
Has a start time: Defines the earliest that this process can be accessed and data submitted by users within the given period. Cut off: Use this to define the cut-off for the process and track whether the submission happened in time. Leaving it blank makes the end of the chosen period as the default cut-off. Reminders get scheduled against the defined cut-off or the end of the chosen period Allow Future Date: Check this to allow users to submit data for a future date. Leaving it blank means that they cannot do so |
|
| Enable Data Edit | Can change any time | This does not by default make all fields editable in the process but enables an Edit option on all Tasks within the process | |
| Duplicates | Can change till first submission | The default setting on Wooqer is that only one submission can be received against a given coverage in a given period. Enabling duplicates allows more than one person to make a submission on the same coverage within the same period. For example: if the coverage is 'Unit', the periodicity - 'Monthly' and the process- a 'Unit audit' is assigned to both the Area Manager and Regional Manager of the unit, then both can audit this unit once in the same month. In such a scenario, you have an option to get a summary report with average, individual scores, lowest or highest score. Duplicates cannot be disabled once data is received. | |
| Only Camera Evidence | Can change any time | By enabling this option, you can disable all attachment options on the entire process, except live pictures clicked from the camera. Leave this blank if you would prefer to make this choice at an individual Task level within process. | |
| End Date | Can change any time. | Your Wooqer processes are perpetual in nature and can be deactivated any time you desire. However, for short lived processes, you have an option to pre-define the End date. The process will be automatically deactivated on this date. You will have an option to change the End date and reactivate the process if desired. | |
| Maximum Score | Can change any time | You have an option to predefine a Maximum score as you start mapping your process on Wooqer. You will not be able to activate the process if the actual score is different from this Maximum score. | |
| Group Code | Yes | Can change till first submission | You can create a new group or use an existing one for easy accessibility of processes. To create a new group you will have to enter three Alphanumeric characters in the first field, once done, then you'll see an option to key in the title of the group in a small dialog box which appears instantly after keying in the data in the first field. If you leave this field blank, the process will by default end up in a default group called 'Others'. Group code cannot be changed once data is received on the process. |
Click on 'Save' to save your configuration and go on to build the template
A. Define the structure
1. Add Section(s) if needed
2. Add Sub-section(s) if needed
B. Add Questions in the desired section/ sub-section and configure Question Properties
1. Add Question : Click here to learn about Questions and choose the right one
2. Define Question Weightage : This weightage shall be used for calculating the Audit Score.
3. Define Question Properties - Click here to learn about Question properties
Need to make changes to your App? Click here to learn how to Edit your App
Click on the 'Done' button at the top or bottom right corner to save your changes and go on to Assign the App
You are now ready to go live with your WorkApp.
Your WorkApp can have 3 types of participants:
1) Assignees - All users who you 'Assign' the App to, are called assignees. Assignees participate by submitting information on the App
2) Report viewers - People who you 'Share' the report with can see data submitted by 'Assignees' for 'Coverages' for which report has been shared with them
3) Actioners - If you have enabled the 'Requires Action' property on your process to convert it into a workflow, the Assignee will submit the information to an 'Actioner' who would need to review the information and take further action on it.
Click here to learn how to Assign and Share your WorkApp. But before you take it to others, assign it to yourself first to make sure that everything is working as expected.
Create Survey
Surveys are a method gathering and measuring information on targeted variables in an established system, which then enables one to answer relevant questions and evaluate outcomes.
When to use this building block
Use this to collect any kind of data - quantitative or qualitative. Allow dynamic alteration by adding questions depending on the answers provided by the users.
Inclusions
Questions: MCQ, Short, Descriptive, Score, Rating, Drop-down select, Dependent, NPS, Location
Process properties: All Coverage's, Timezone, Occurrence, Cut-off, Data Edit, Geo-compliance, Duplicates, Only Camera Evidence, Multiple Records, End Date, Group Code
Exclusions
Process properties: Question Tag, Maximum Score, System Calculated Score
Use cases
Daily Sales Report, Ops Issue Tracker, VM Review
Sample Report
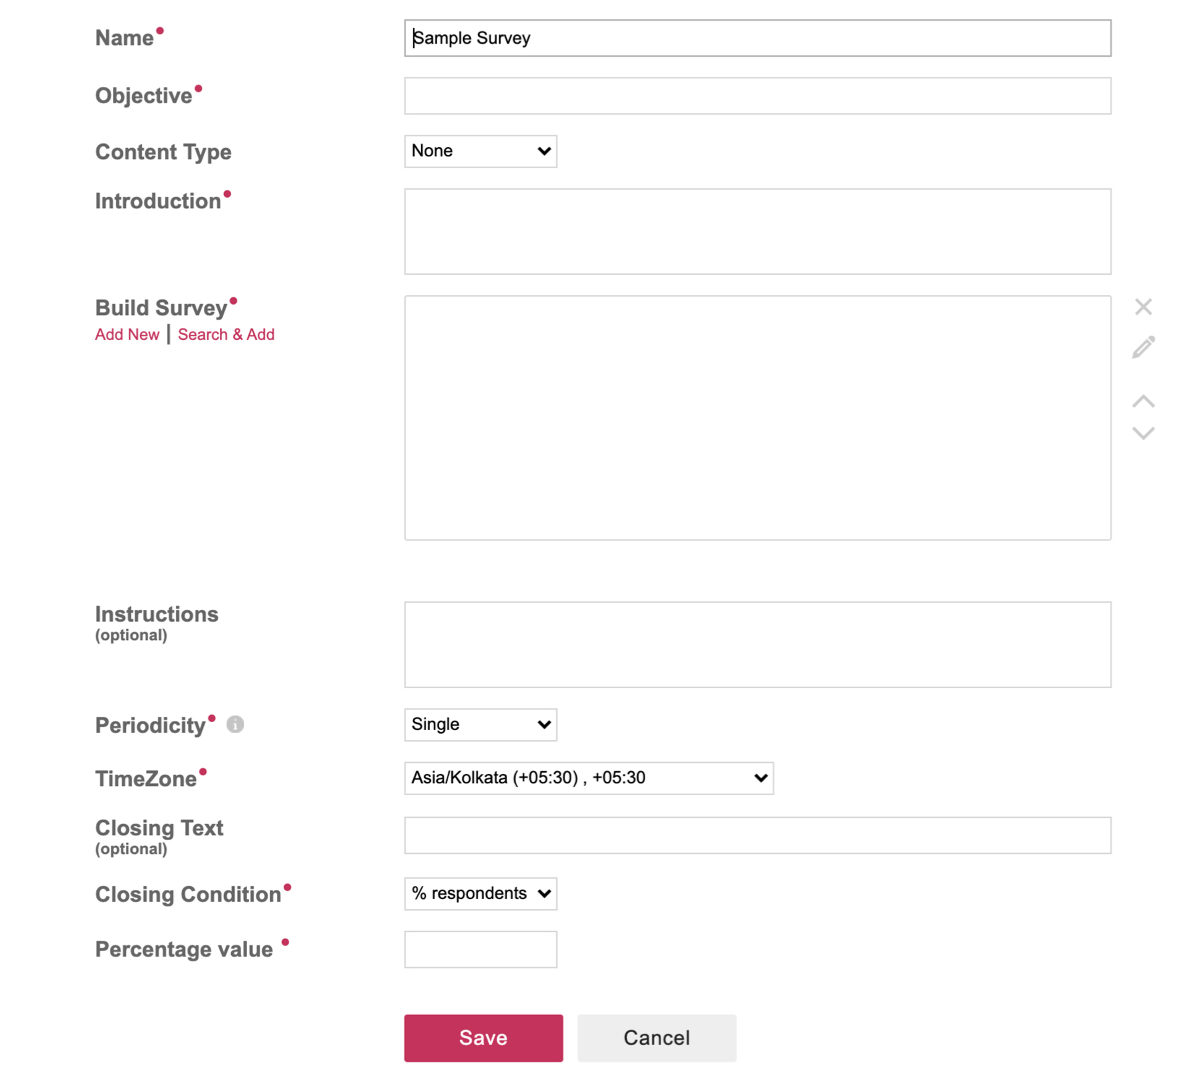
Click on Content->Surveys-> Add New
Survey Name - Name your Survey. The name can be upto 40 characters
You can choose to create new Survey or create a copy of an existing one and reconfigure that
Click on 'Continue' to start configuring your Survey
|
Property |
Mandatory |
Editability |
Description |
|
Name |
Yes |
Change any time |
You can change the name of the Survey. The name can be upto a maximum of 40 characters |
|
Objective |
Yes |
Change any time |
As new people access this Survey to submit information, the objective helps them understand the purpose giving them context to participate in the Survey. |
|
Content Type | Introduction |
Yes |
Change any time |
You can add a content file (ppt, pdf, doc, video, image) that participants can see before starting the surveyor type in an introduction. You need to include at least one of these |
|
Build Survey |
Yes |
Change any time |
Go ahead and Add New questions or Select questions created in the past. Click here to learn about Question types |
|
Instructions |
Change any time |
Add instructions for new users to get context of the Survey |
|
|
Timezone |
Yes |
Change till first submission |
Select the Time zone in which the Survey shall be run/ managed from. |
|
Periodicity |
Yes |
Can change till first submission |
This field gives you an option to select how often this Survey repeats itself. You can choose from monthly, quarterly, half-annually, annually or set a custom frequency. |
|
Closing Text |
Add a Thank you message for users that they shall see as they complete the Survey |
||
|
Closing Condition | Completion by |
Yes |
Cannot be changed once Survey is closed |
% respondents - Configure to close the Survey automatically when a certain participation percentage is reached Date : Define a dat or number of days into each cycle when the Survey shall close. Once closed, the survey cannot be reopened or edited in any way, so if not absolutely sure, keep a far out date to give yourself to opportunity to come back and make changes. Users do not see the closing condition anywhere. |
Click on the 'Save' button to save your changes and go on to Assign the Survey
You are now ready to go live with your Survey.
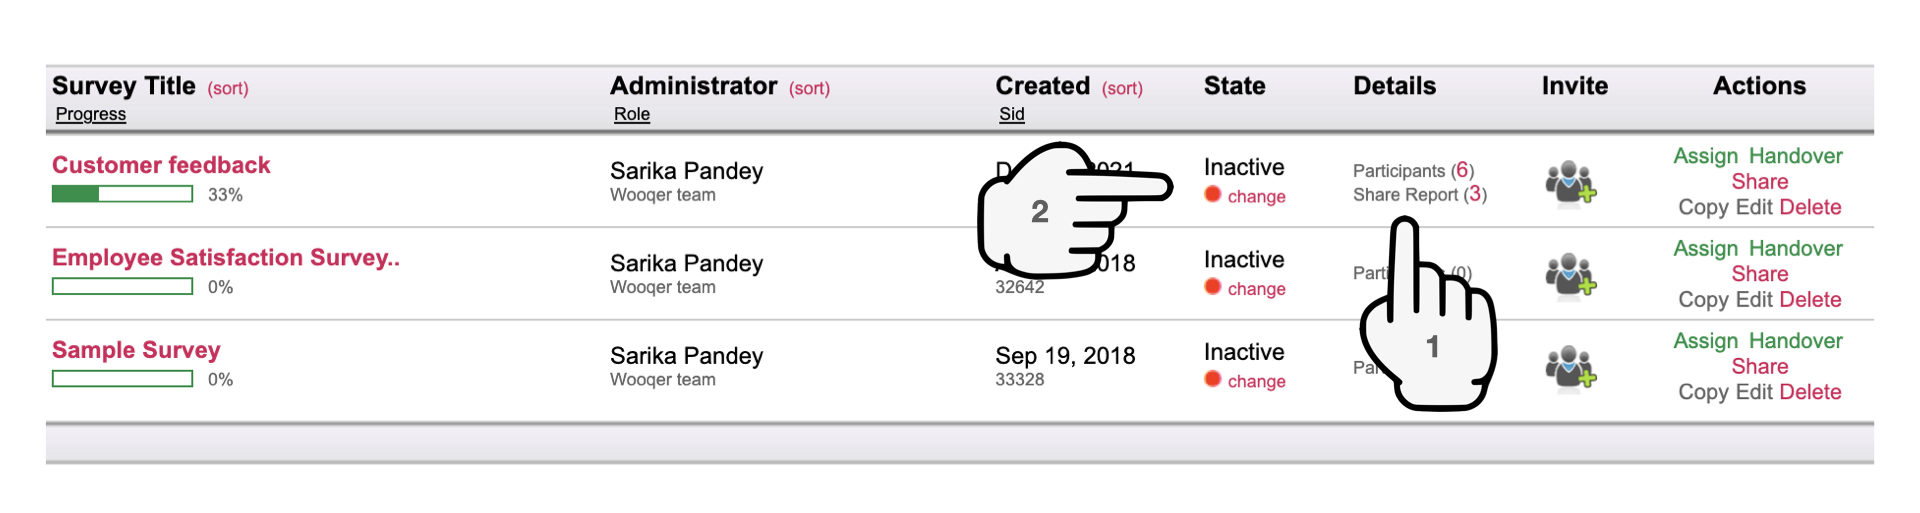
A. Invite participants
1. Click on 'Assign' to invite people with Wooqer IDs to participate in the Survey. The Assignees will respond to the Survey through their Wooqer ID.
2. Click on the 'Invite' icon to invite external users without Wooqer IDs to participate in the Survey. External participants do not need the App to participate. Just add their e-mail IDs (comma separated) and the invite will go to them in their mail ID. They can click on the Take Survey button in the mail and the survey form will open up on their browser with your branding.
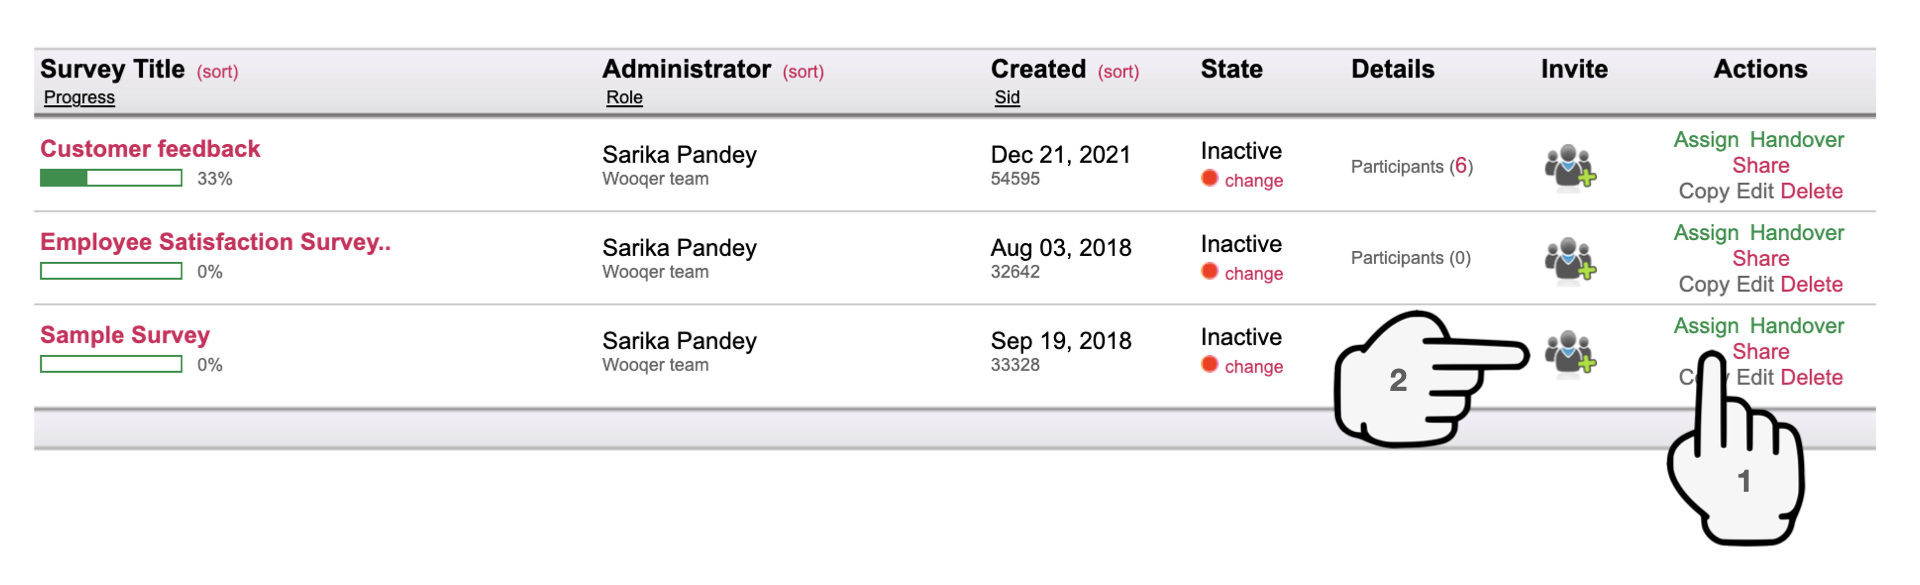
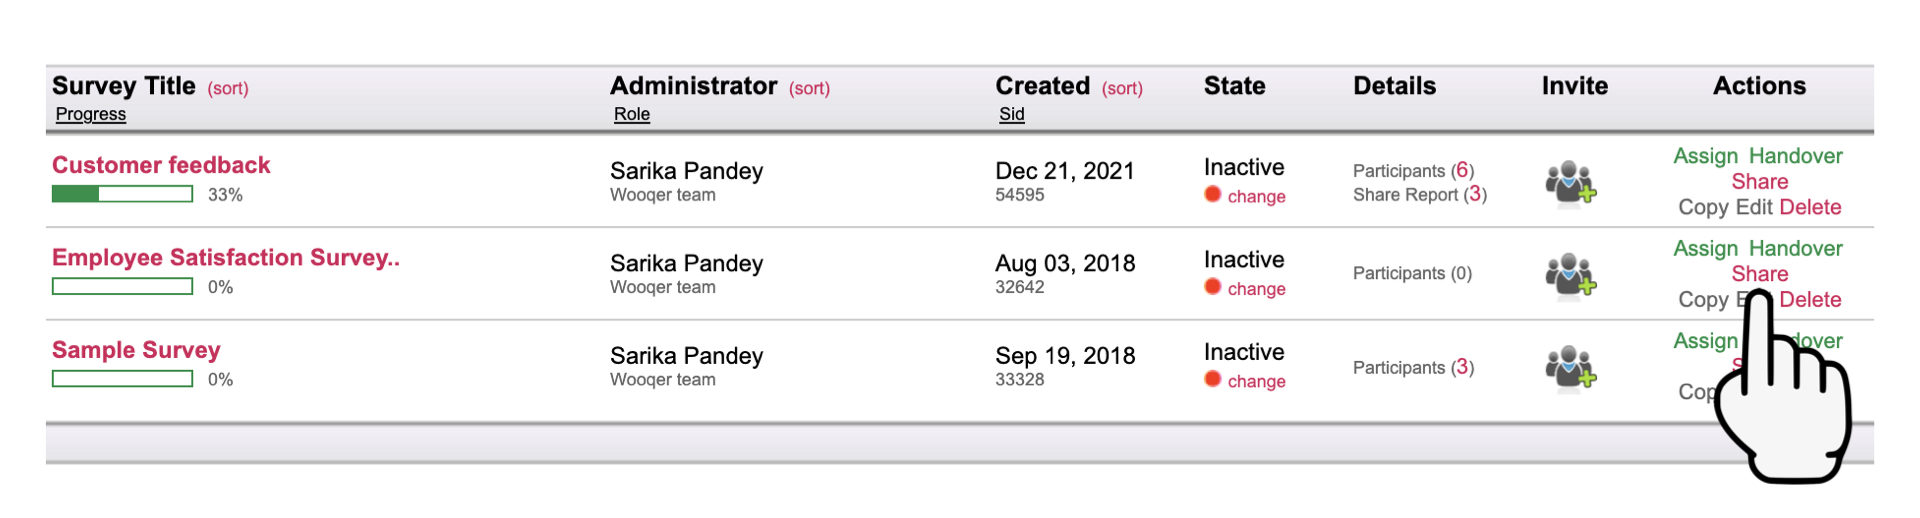
B. Share report
If you need to share the report of this Survey with any seniors, use this option to do so. Users in a role that your role reports into have report access by default and you do not need to share the report with them.
C. Launch Survey
1. Check the invitees and report viewer details to make sure that you have extended access to the right people. You can click on 'Participants' or 'Share reports' to withdraw access if any access has been extended by mistake.
2. Click on the 'change' button to activate and launch the survey